We have become increasingly interested in the photography of insects over the past few years. One motivation for this is that with iNaturalist it is possible to identify insects much more rapidly (and with less effort and resources) than what was possible previously. But it isn’t just knowing what insect you are seeing and photographing. It is that with iNat you are contributing to the building of a data base of where, when, and what types of organisms you are seeing. You are contributing to building a global data base that can, and is, being used for a better understanding where life is found on Earth. See our discussion of biodiversity and citizen science here.
There is more to it. While there are already tens (or hundred’s) of thousands of iNaturalist observations that show where popular biota (“biota” includes animals, plants, fungi and such) when it comes to less popular biota like insects there can be much fewer observations. For example, there are currently 1519 Beetle observations on iNaturalist from the state of Florida. Of these there are 380 species with more than 20 observations – and only 140 species with more than 100 observations. There are 305 beetle species with 5 or fewer observations from Florida. And Florida has many iNaturalist observations – as of November 2025 there were 4.5 million iNaturalist observations of all kinds (and 84 thousand beetle observations).
Consider Ecuador, a tropical country with huge elevational, climatic, and vegetation variations. As of Nov 3, 2025 there were 1289 beetle species with research grade (verified by at least one observer as well as the AI algorithm) on iNaturalist. Of these only 150 species had twenty (20) or more observations. There were 625 species with 5 or fewer research grade observations and 220 species with only 1 such observation. Even in Oklahoma, where we live, we are making observations in our backyard of insects that have not been previously reported from our state.
The reason why observations are needed is that to map the distribution of a particular species across the landscape – and to begin to understand why it has that distribution – you need many observations. Many species are active only at one time of the year and to understand when they are active and observable we need observations throughout the year. One quickly sees that many observations are needed to begin to describe the occurrence a given species in space and in time.
Now that we appreciate how few insect observations are made relative to more easily seen biota (like common plants, birds, mammals) how do we begin to make more such iNaturalist observations? iNaturalist requires a photo of biota to begin the identification process. The vast majority of cameras now are cell-phone cameras. These are fine for people-portraits and larger objects and landscapes, but are poor for smaller insects. Larger butterflies, moths and beetles can still be photographed by such phone cameras, but when the size of the insect becomes small (say 10mm or less and under dark conditions) it becomes difficult to see key features for identification. The best photographic equipment currently are digital single lens cameras (or mirrorless cameras) with a close-focusing (so-called “macro”) lens. Most normal lenses don’t focus close enough to get large images of small insects. But to get acceptably sharp images over the insect’s body one has to choose small apertures (f-stops like f16 or such) and this makes photography with available light difficult since the shutter speed needs to be long. Thus a flash becomes necessary – and this is in any case essential for photography at night.
In summary, a macro lens and a flash (ring flash is usually best) are needed, along with a standard interchangeable lens camera. The ring flash produces less harsh shadows that a standard flash, though is somewhat more cumbersome to use. A ring flash with supplementary focusing light is most convenient. Otherwise one hand needs to hold a light source while the other holds the camera. That said, my current combination shown below, including camera, 90mm macro lens and the ring flash unit, weights 2040 grams (4.5 pounds)! Rosario’s iPhone 14pro weighs 206 grams – 10 times less!! And although iPhones are relatively expensive for smart phones, the Olympus camera (now called “OM system”) combo shown below costs approximately $3300, about three times a new iPhone today (2026). So dedicated insect photography does require an investment, though you can get functionally equivalent, used equipment, for probably $1000 or even less. Camera bodies quickly depreciate in value, though quality lenses don’t do so as rapidly.
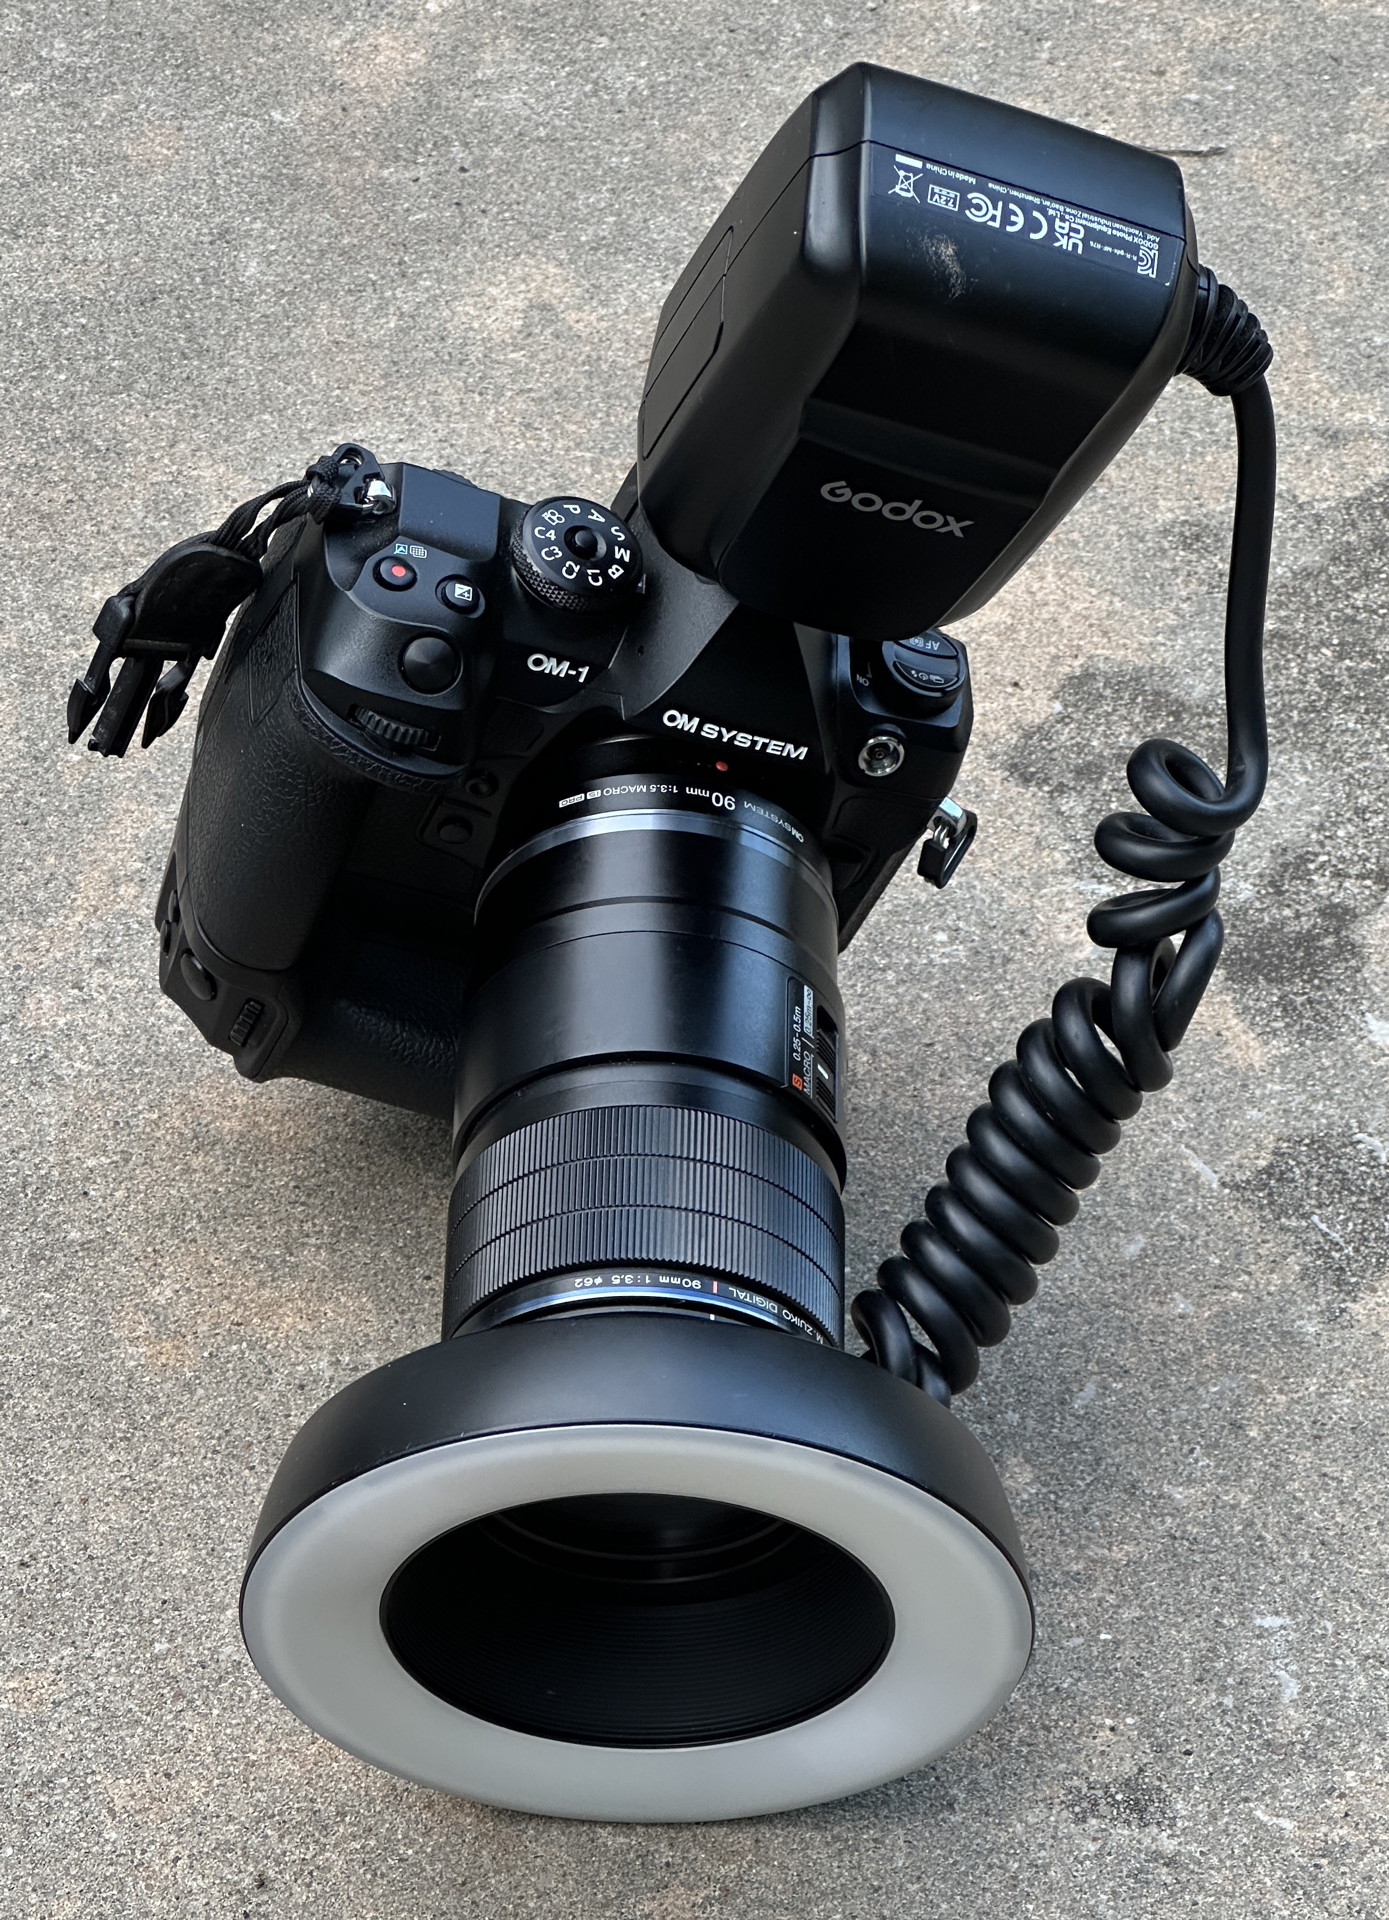
Our current macro set-up for insect photography. It weighs about 4.5 pounds!
Finding insects
Insects are virtually everywhere, but to find them requires a bit of knowledge. Many insects are pollinators of flowering plants so a good place to start looking is in flowers. Then, many other insects eat or suck the juices of plants. Stems and leaves are where many of these are found. Lights are the most convenient what to find moths, as many come to lights at night. But moths are most sensitive to ultraviolet light and special light arrangements can be used to attract them. Other insects also come to such lights.
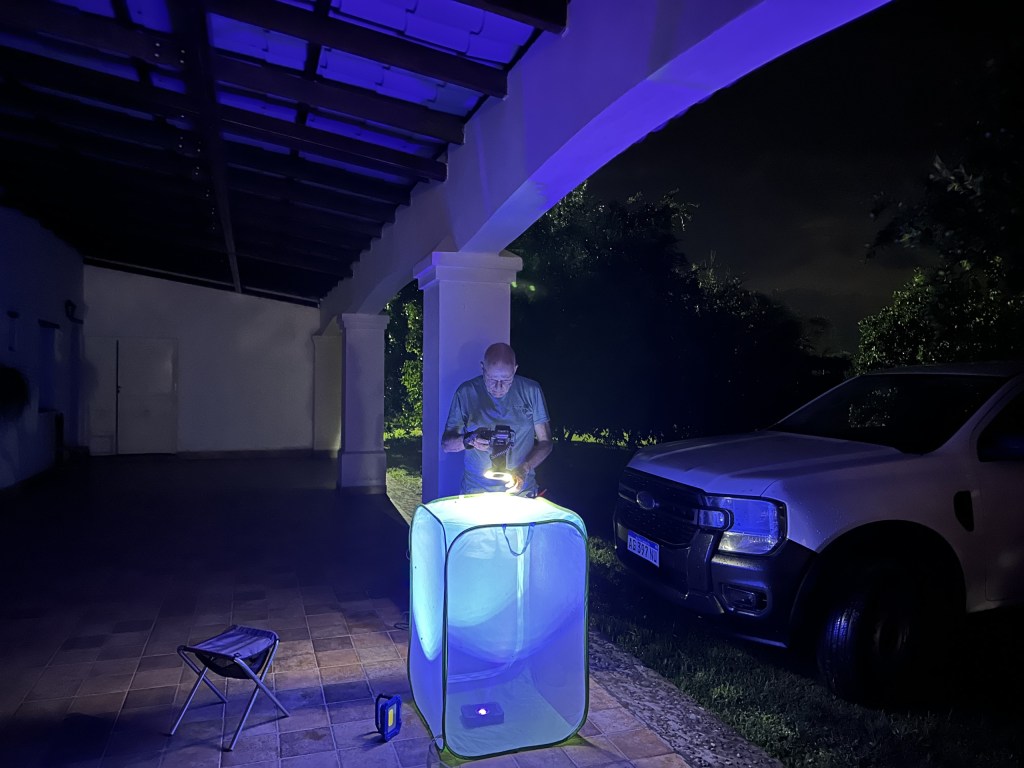
Just what kind of set-up is best for photographing moths and other insects at light? Our system uses a “cage” that is built and sold commercially for rearing monarch butterfly caterpillars. (An example of what we have bought is here – but there are others.) This is foldable into a compact circle about the same size as diffusers commonly used for portrait photography. We put UV lights (either battery powered or those who are plugged into 110 volt power) into the cage and zip it closed. Then the insects are attracted to the lights but cannot enter the cage. We then photograph whatever comes to the top or sides of the cage (one side of this cage is clear plastic and much fewer insects are able to adhere to it).
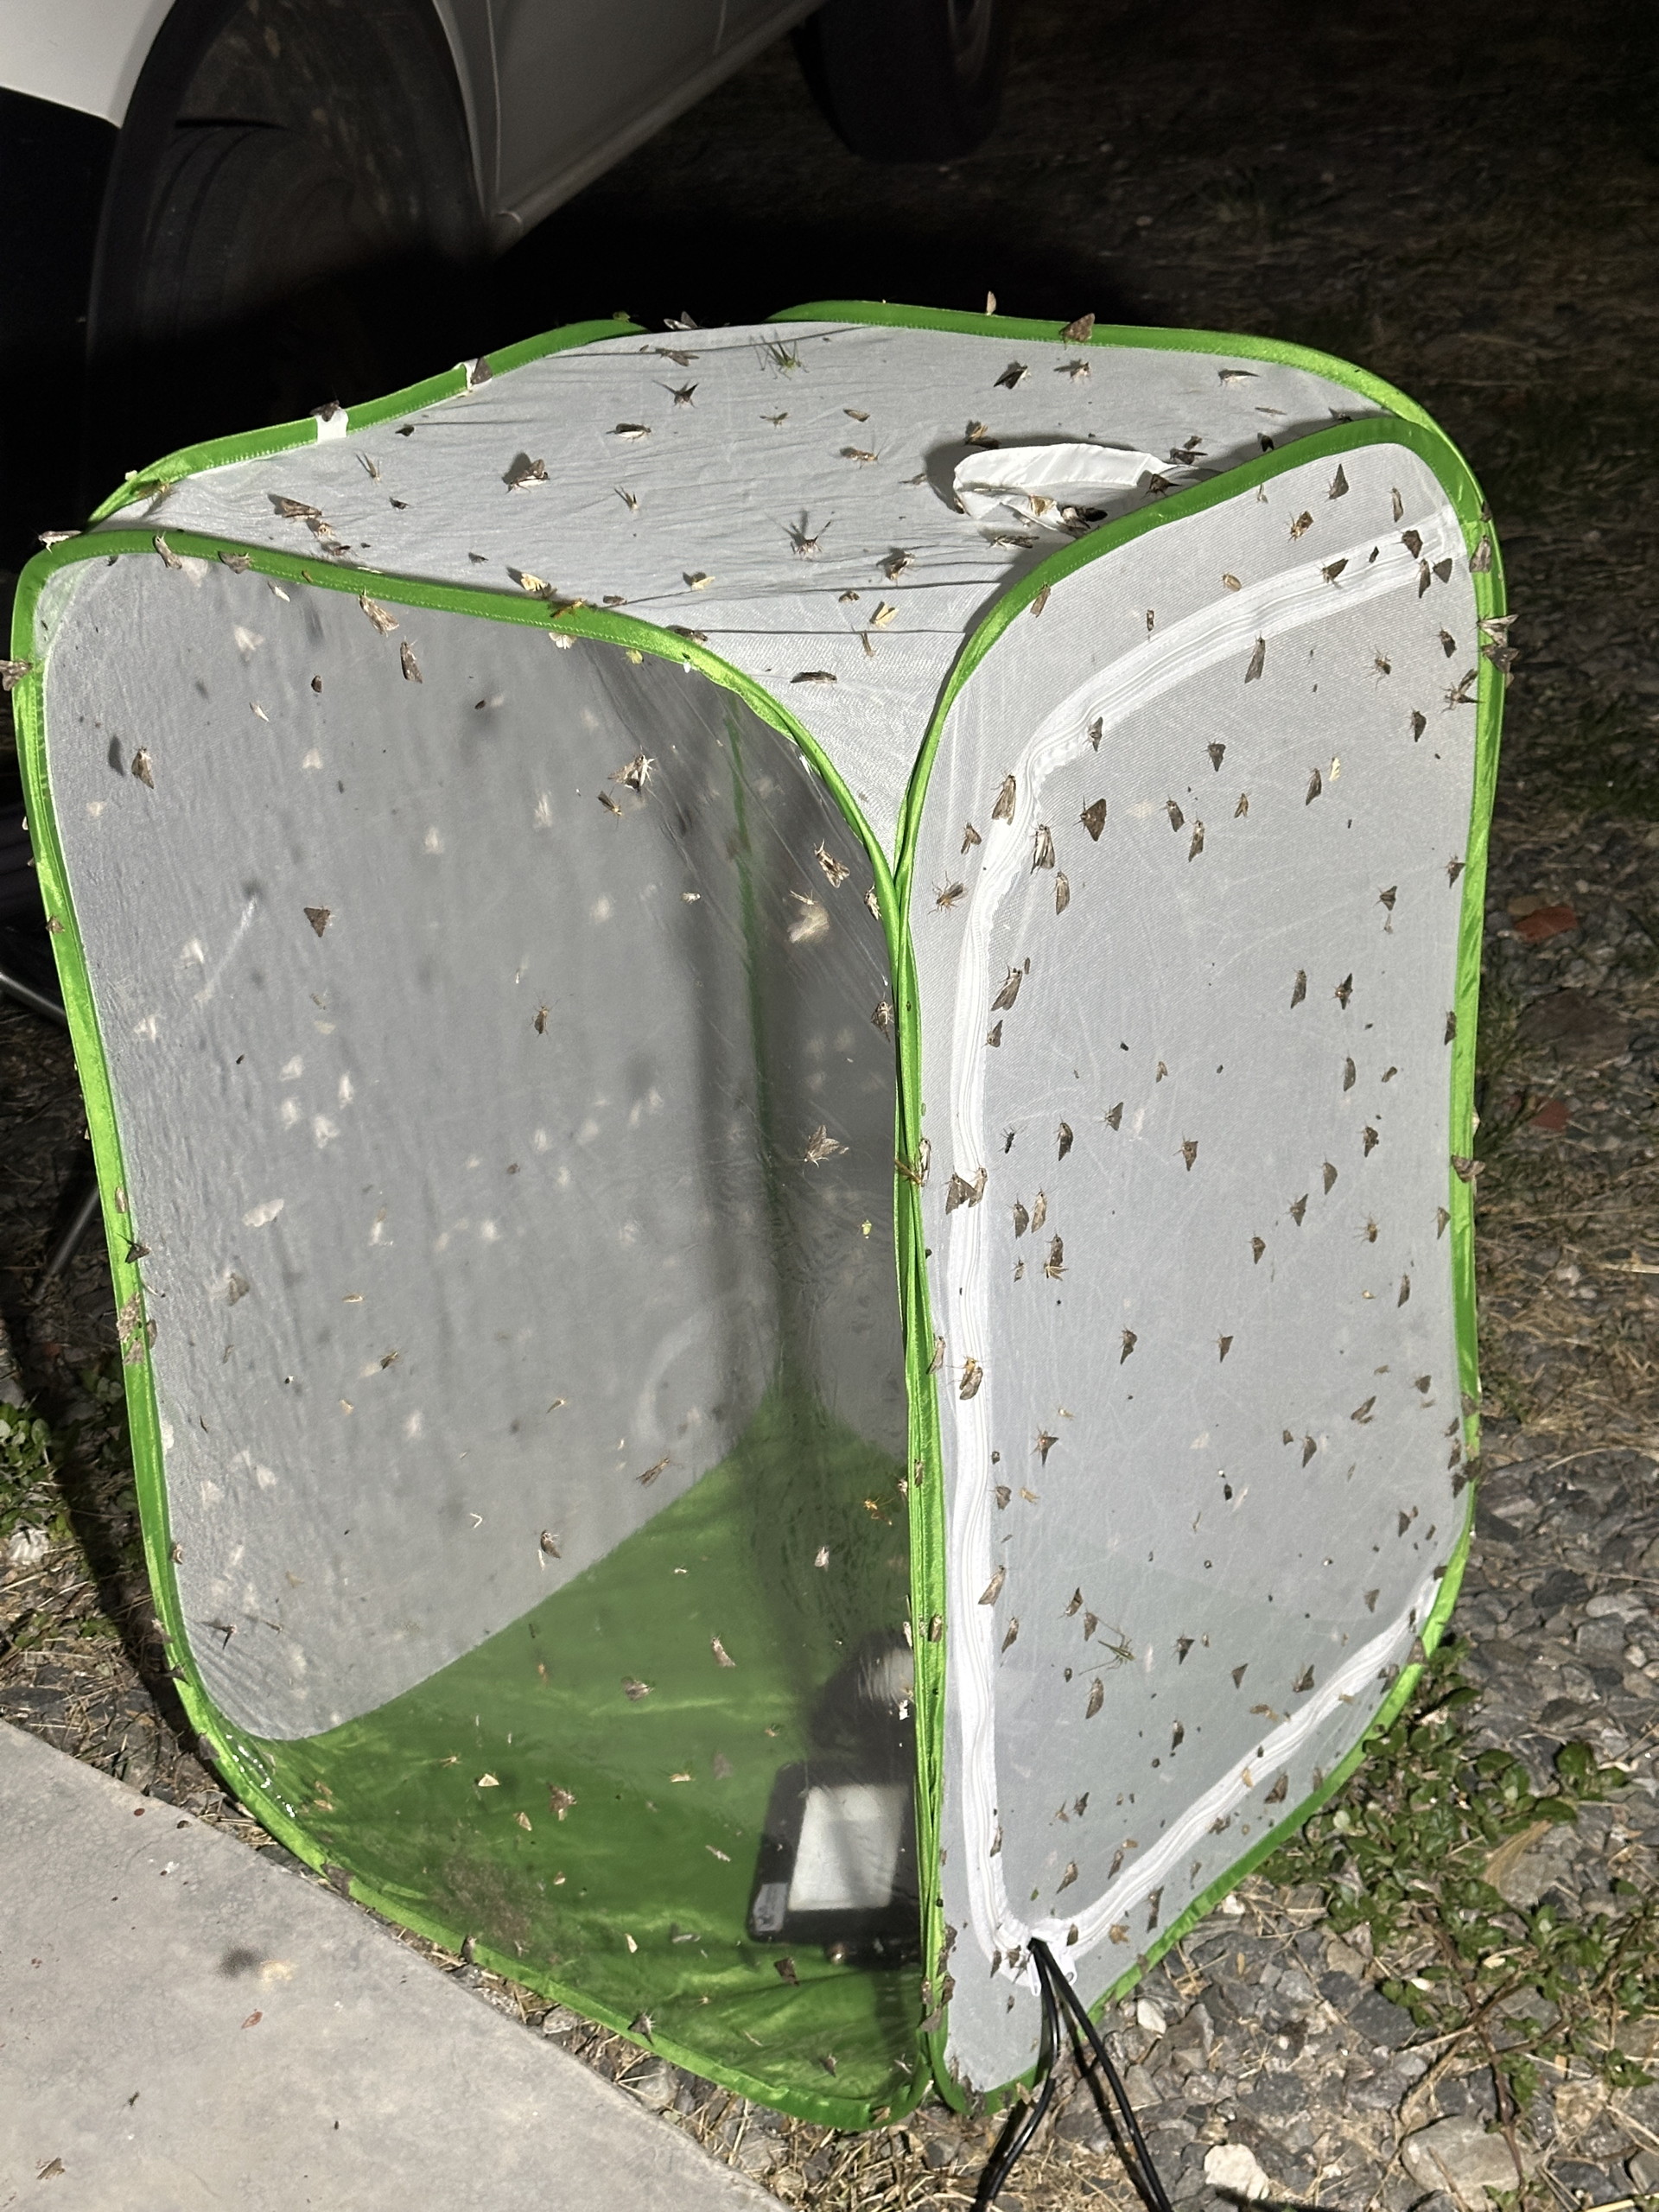
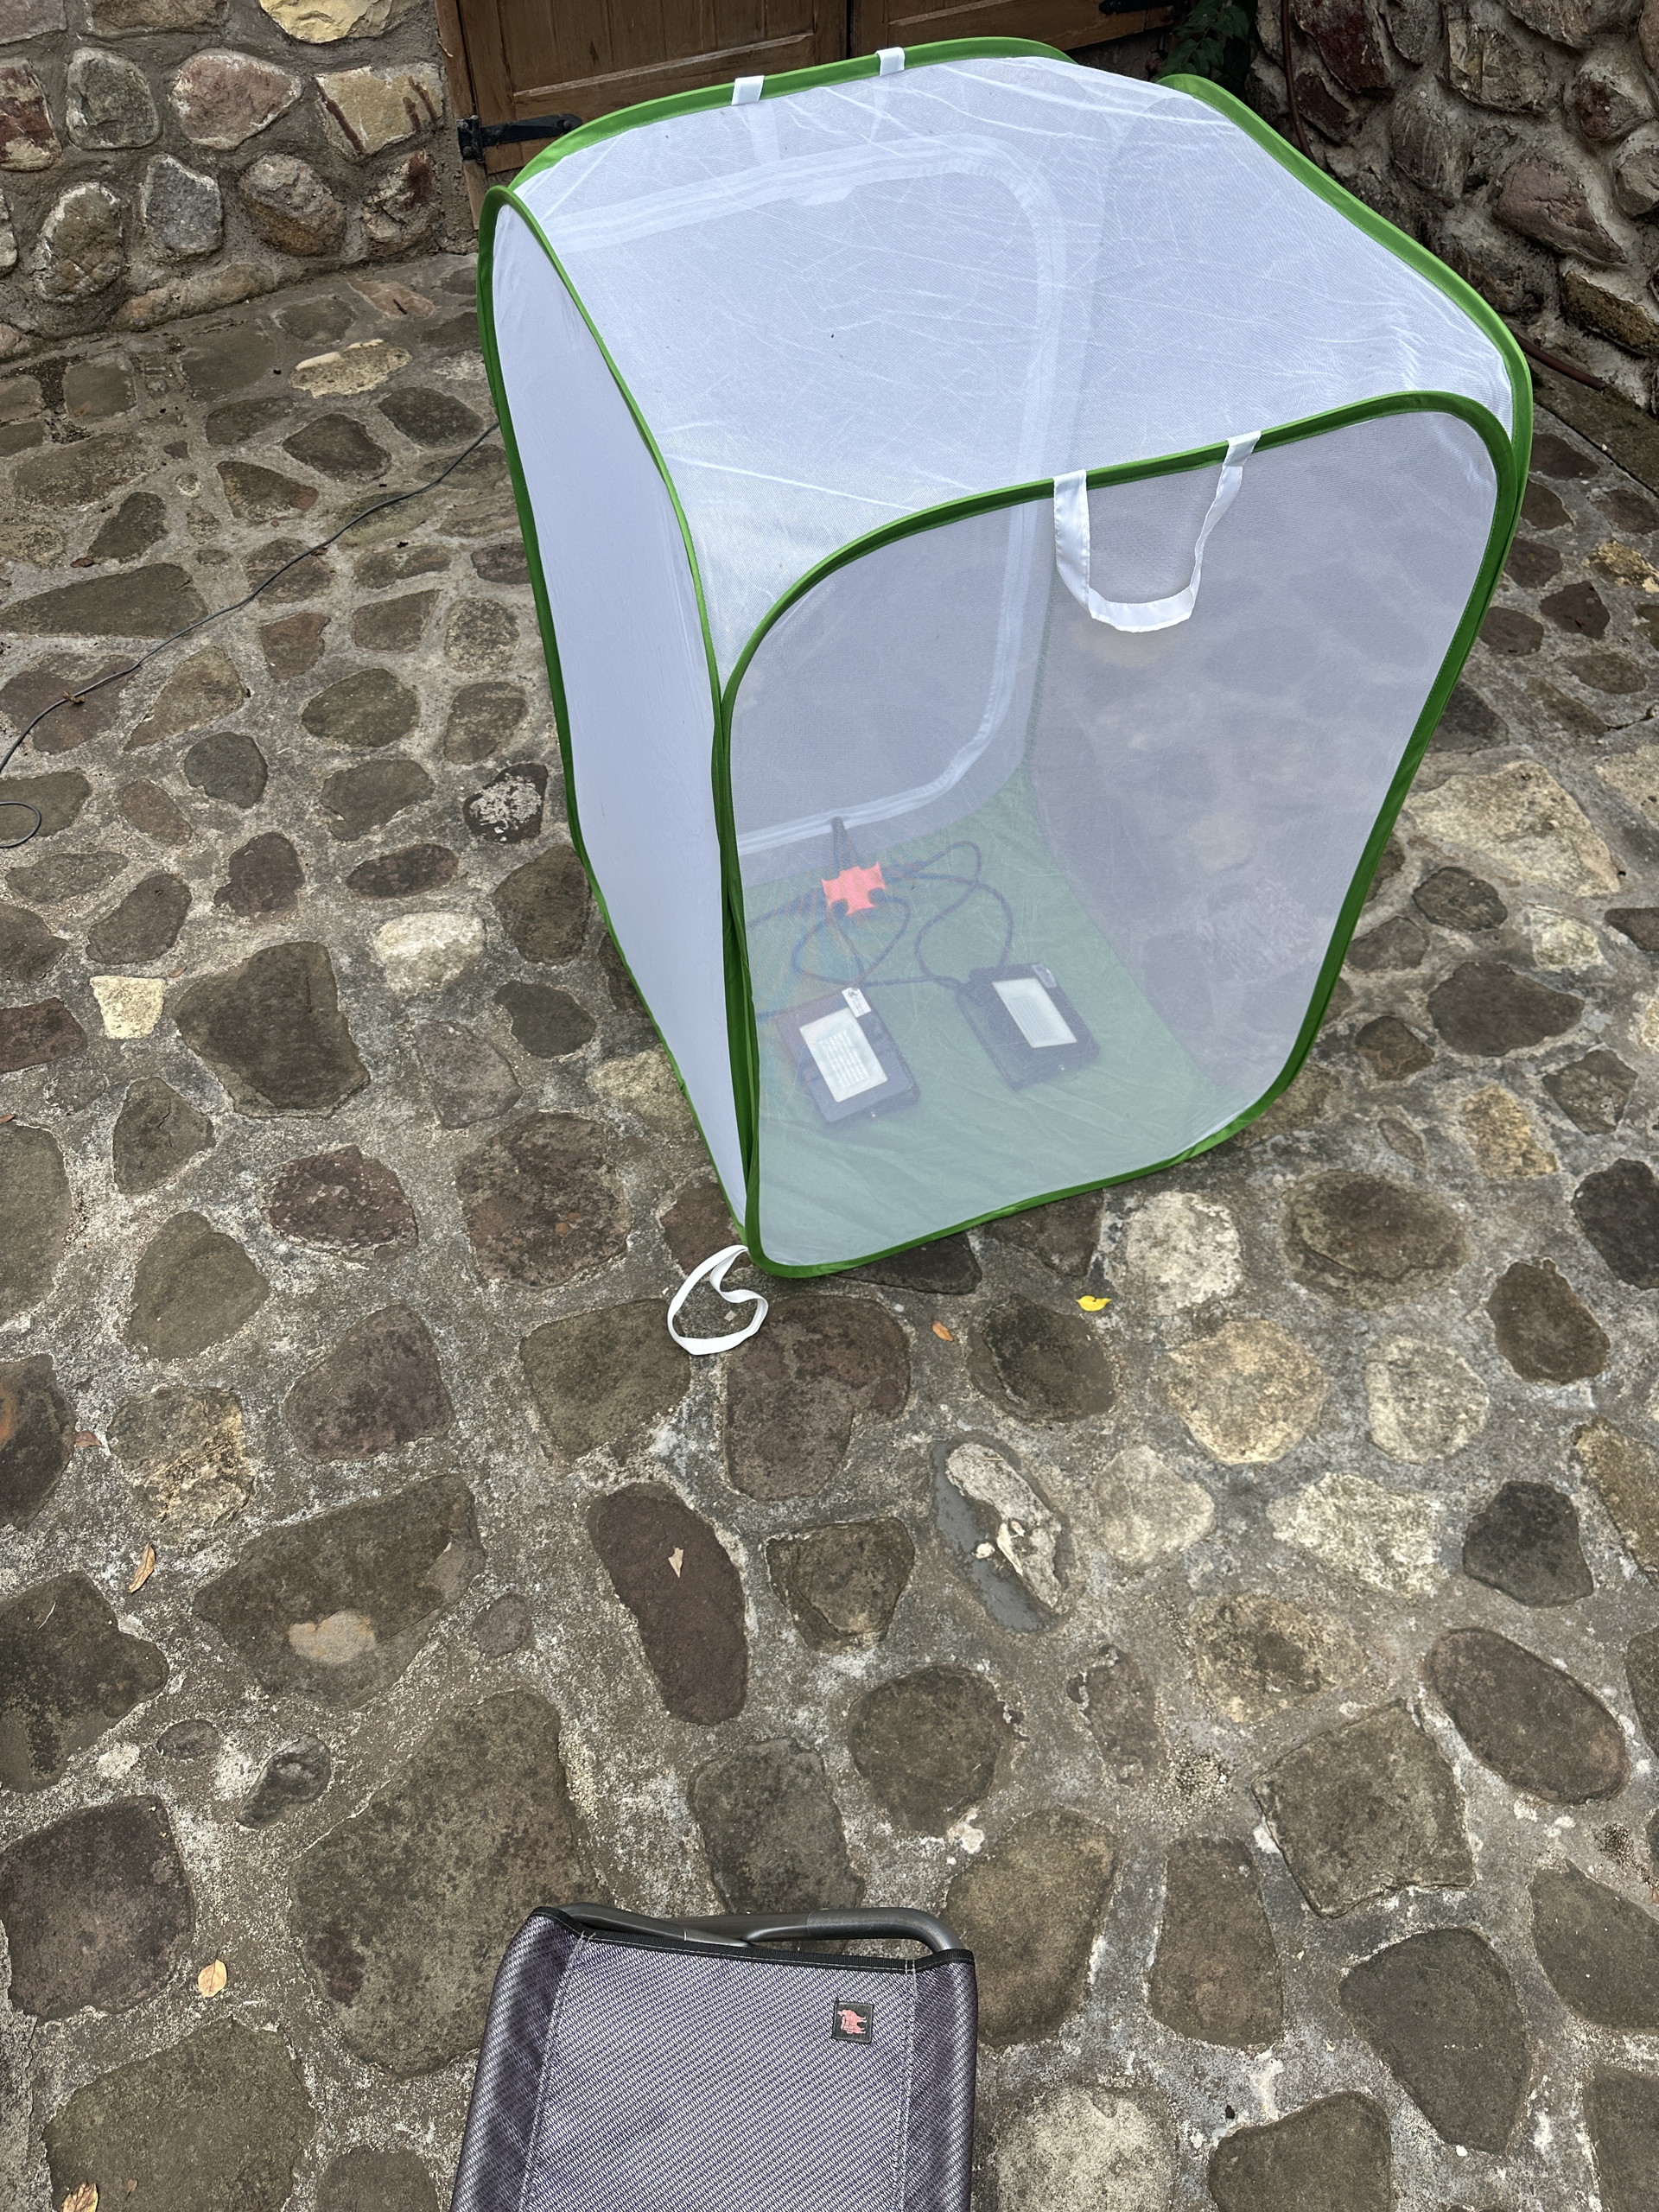
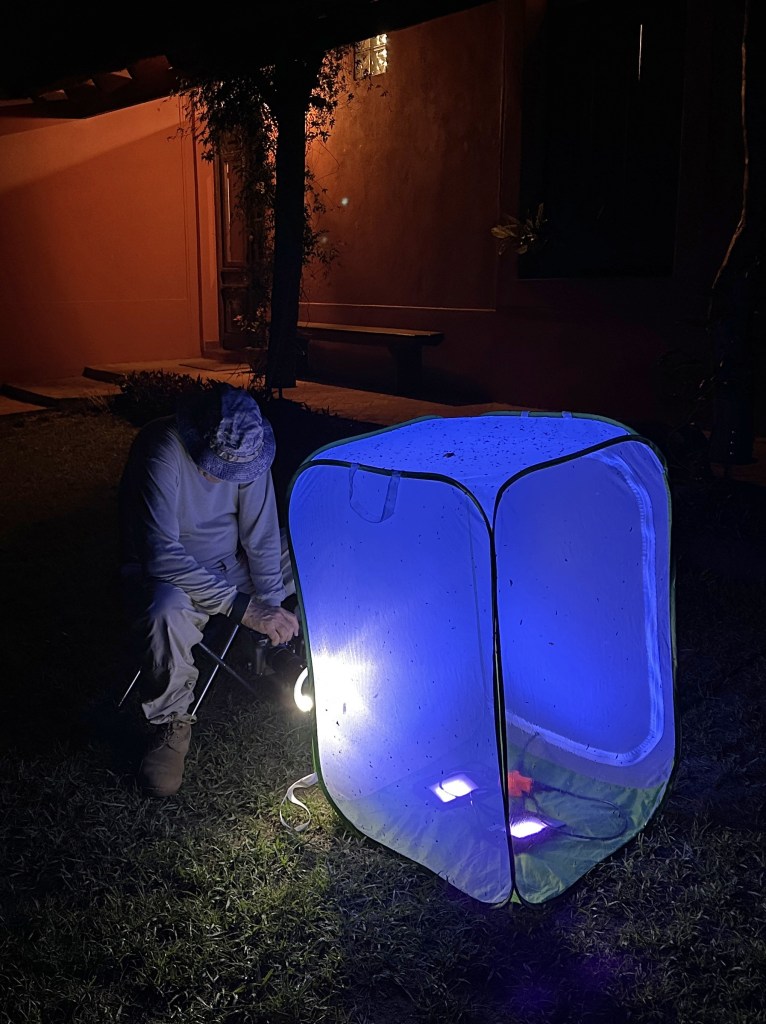
Our moth cage is shown above. In both cases we are using 110-220 volt AC-powered UV lights because power was available. Note the short folding chair in the right image. We bring this even on flights since it greatly aids in stability when photographing. Photo at left is flash photo at night while that on right is daytime (no insects).
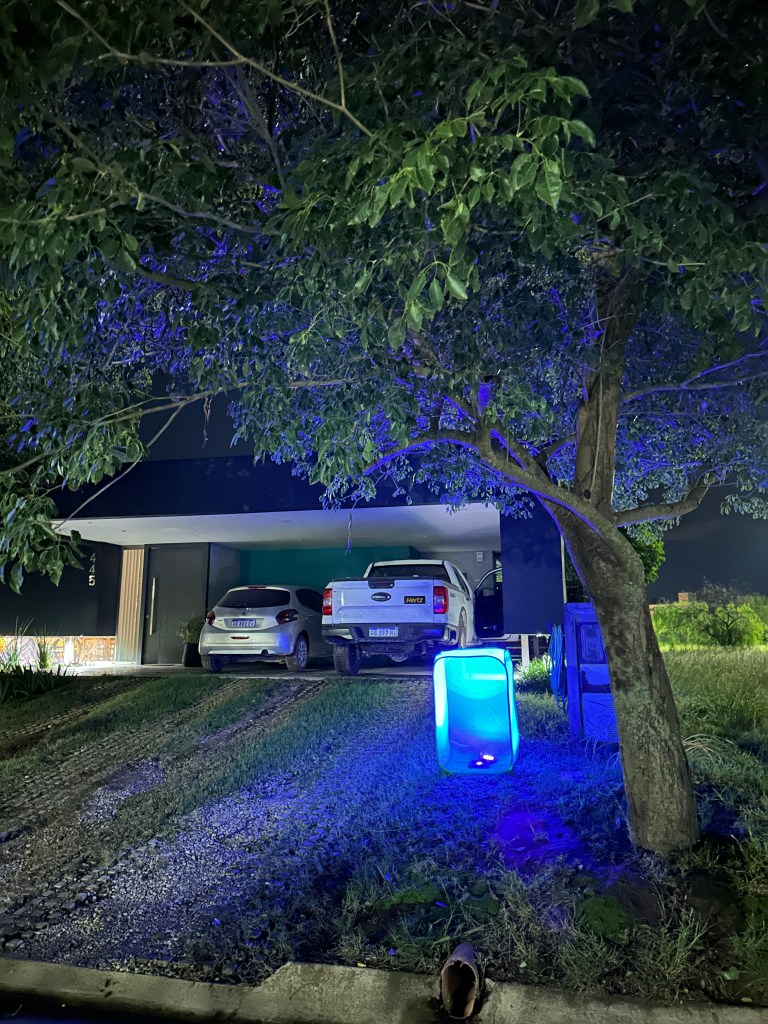
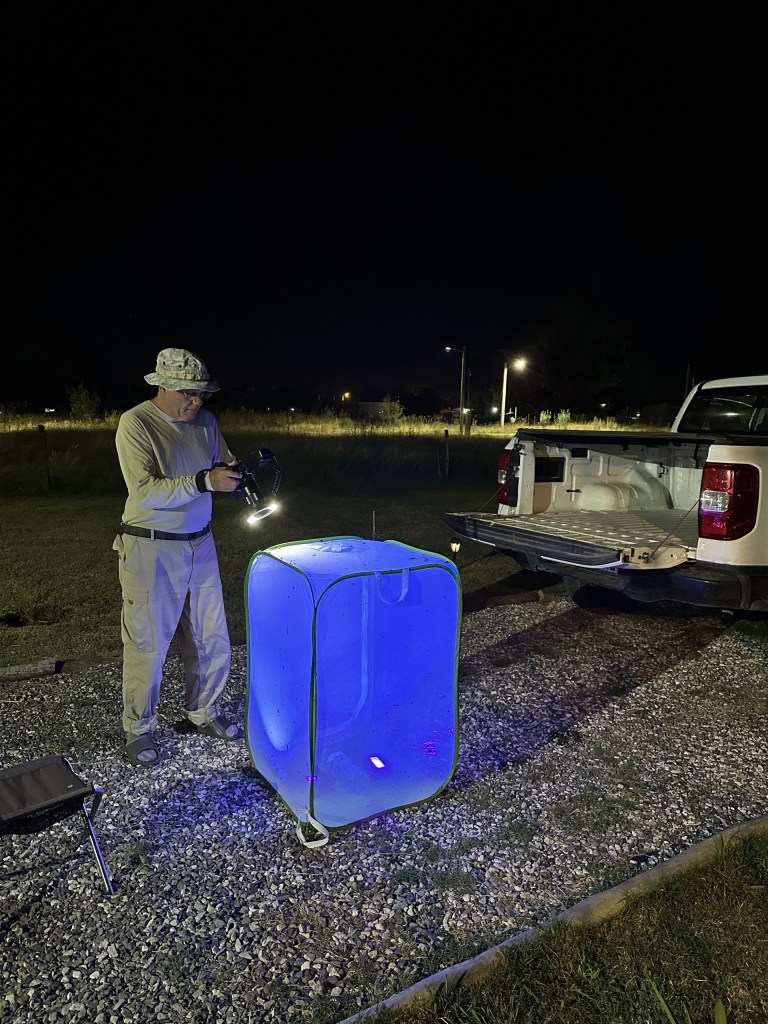
Above: Examples of deployment in Argentina. Left: Power cords run from our accommodation to our lights on the lawn in front. This was a “birding accommodation” with semi-natural surroundings. Middle: Battery-powered lights deployed in a small suburb with space between homes in an agricultural town. Problem was not insects here – but stray dogs that forced an early exit inside! Right: Battery-powered lights next to our cottage at edge of another small town.
One battery-powered UV light attracting moths on a hotel walkway in front of our room. There was a power-outage later due to a strong thunderstorm and people actually appreciated having some light. Note the stool – it isn’t useful for insects on the top of the cage.
Advantages and disadvantages to our set-up.
The main advantage of using our set-up is that it can be deployed quickly – in a couple of minutes. Since we frequently move from day-to-day when we are camping, a fast set-up is needed. The cage can blow over in strong enough wind so we sometimes put a water jug inside the cage, or rocks on each corner (inside) to keep the cage from blowing over.
The common set-up for public moth nights is to stake poles down and stretch a large cotton sheet between them and shine a bright light (often 250 watt bulbs requiring a ballast) at the sheet. Having been to enough “moth nights” we realize that this is more effective in attracting large numbers of insects than our arrangement. But, in most campgrounds, these lights are unacceptably bright, especially since many campgrounds are moving towards “dark-sky” philosophies where excess lighting is strongly discouraged. These bulbs also get very hot and can break if water (raindrops) touches them.
The most serious deficiency of using large sheets stretched between poles or trees is that they move in the slightest wind. A sheet’s movement makes focusing very difficult when one is in the macro range. A second drawback of using the suspended sheet arrangement is that it takes some time to set-up. If the ground is hard and there are few trees it may be difficult to suspend the sheet. The poles needed can be long, and the needed guy cords can be tripped on in the dark.
A major advantage of the Monarch cage is that the mesh sides are held relatively taught by its metal frame. Not perfectly motionless if there is wind, but much better than a large suspended sheet. In fact, the coarser the mesh the less movement in a wind. The rigidity and the speed of setting up the monarch cage are its main advantages.
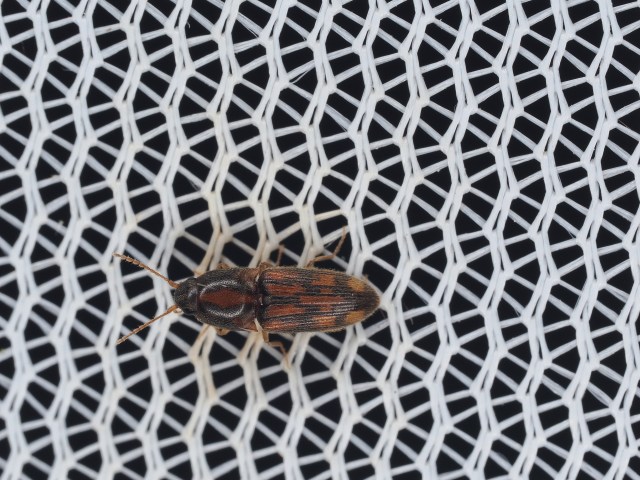
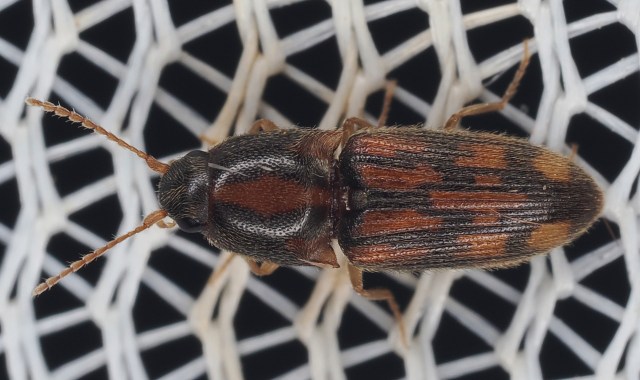
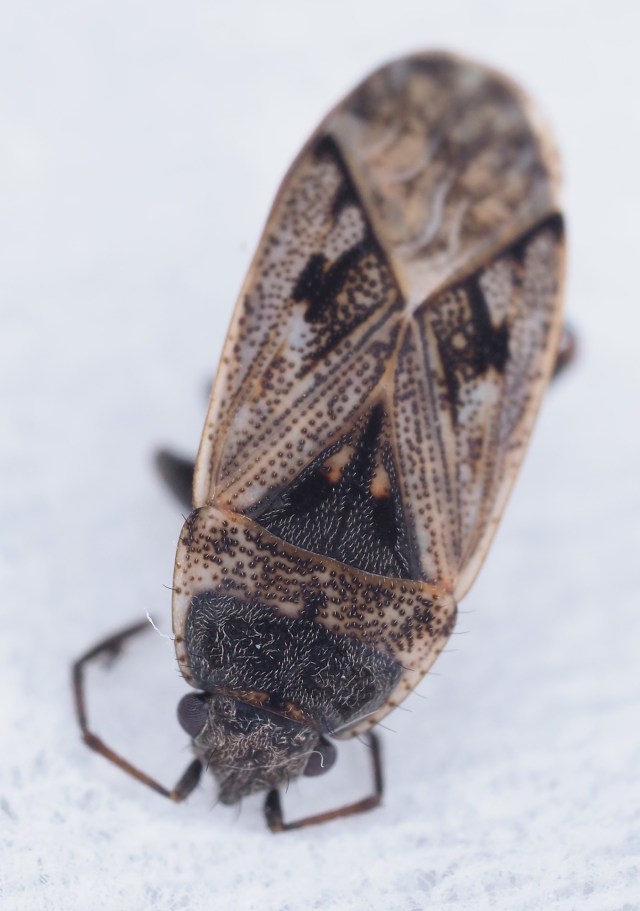
One downside of the monarch cage is that the mesh can be a distracting background with some subjects. That is, it can confuse seeing the structure of some insects. A comparison is shown below.
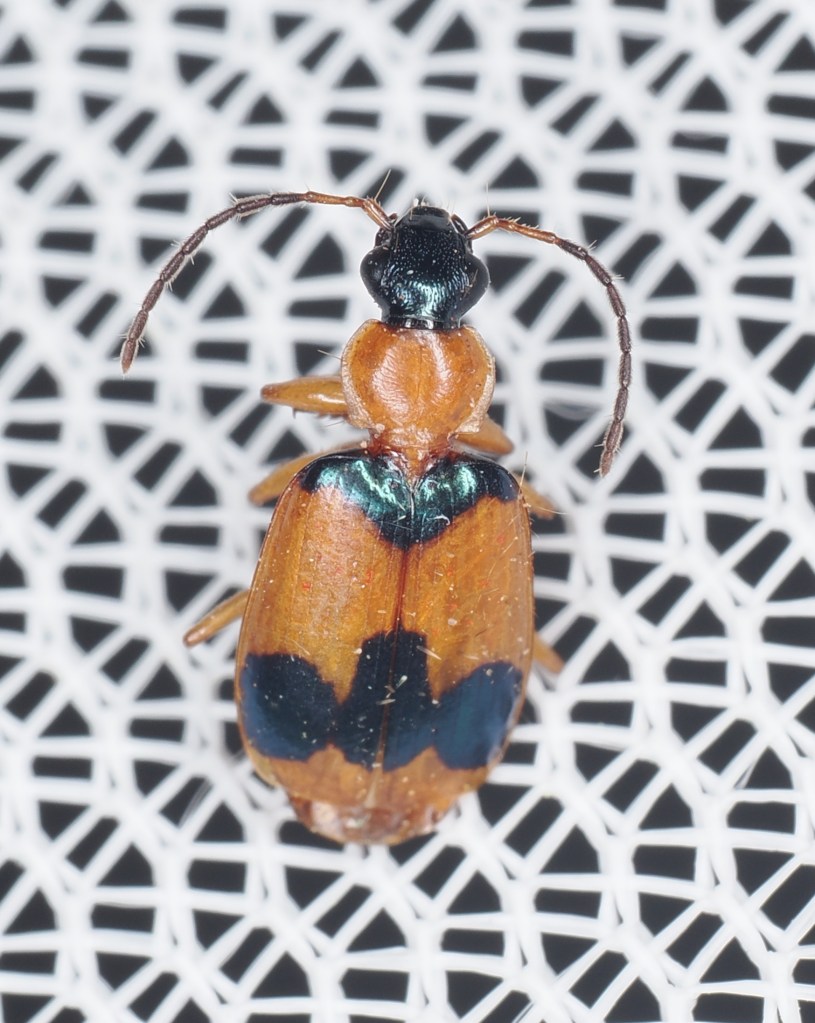

Photos above show the same beetle on our mesh and on a piece of a bed sheet. The background can be somewhat distracting.
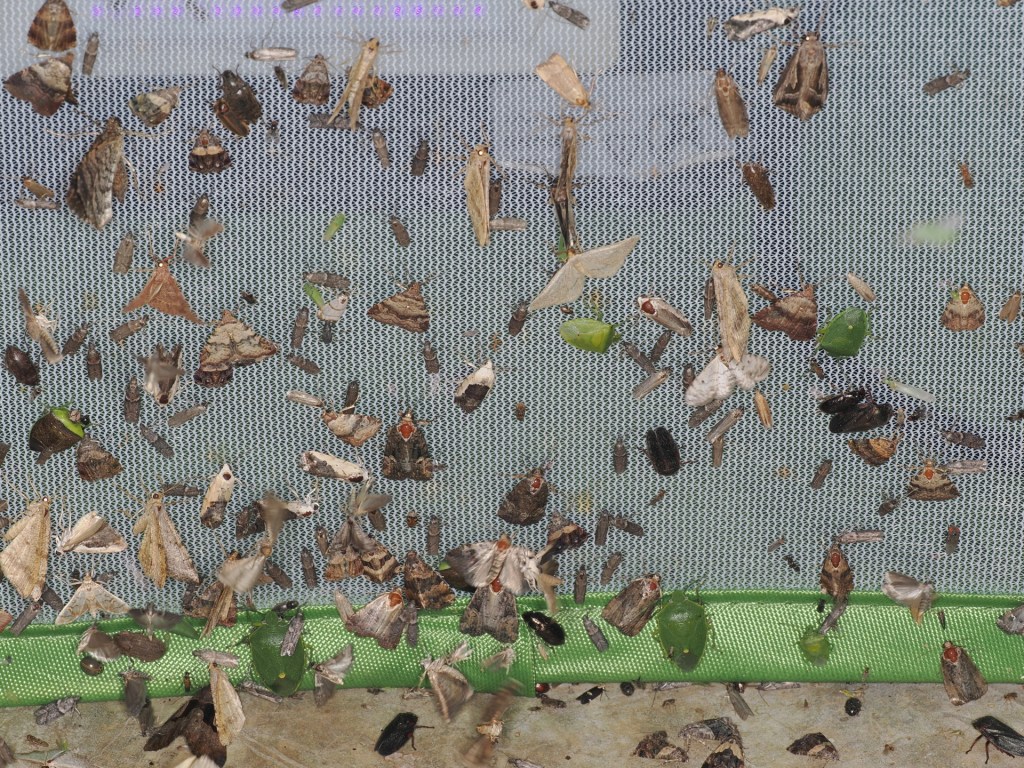
The upside of the mesh is that the distance between the mesh bands is very close to 1 mm – there are 25 grids in one inch. Thus the size of an insect can be estimated from the mesh (see the image below). The size of a moth resting on a tree trunk or a featureless sheet can not be similarly estimated. But for a “nature” photo suitable for a wider audience the mesh is a distraction.
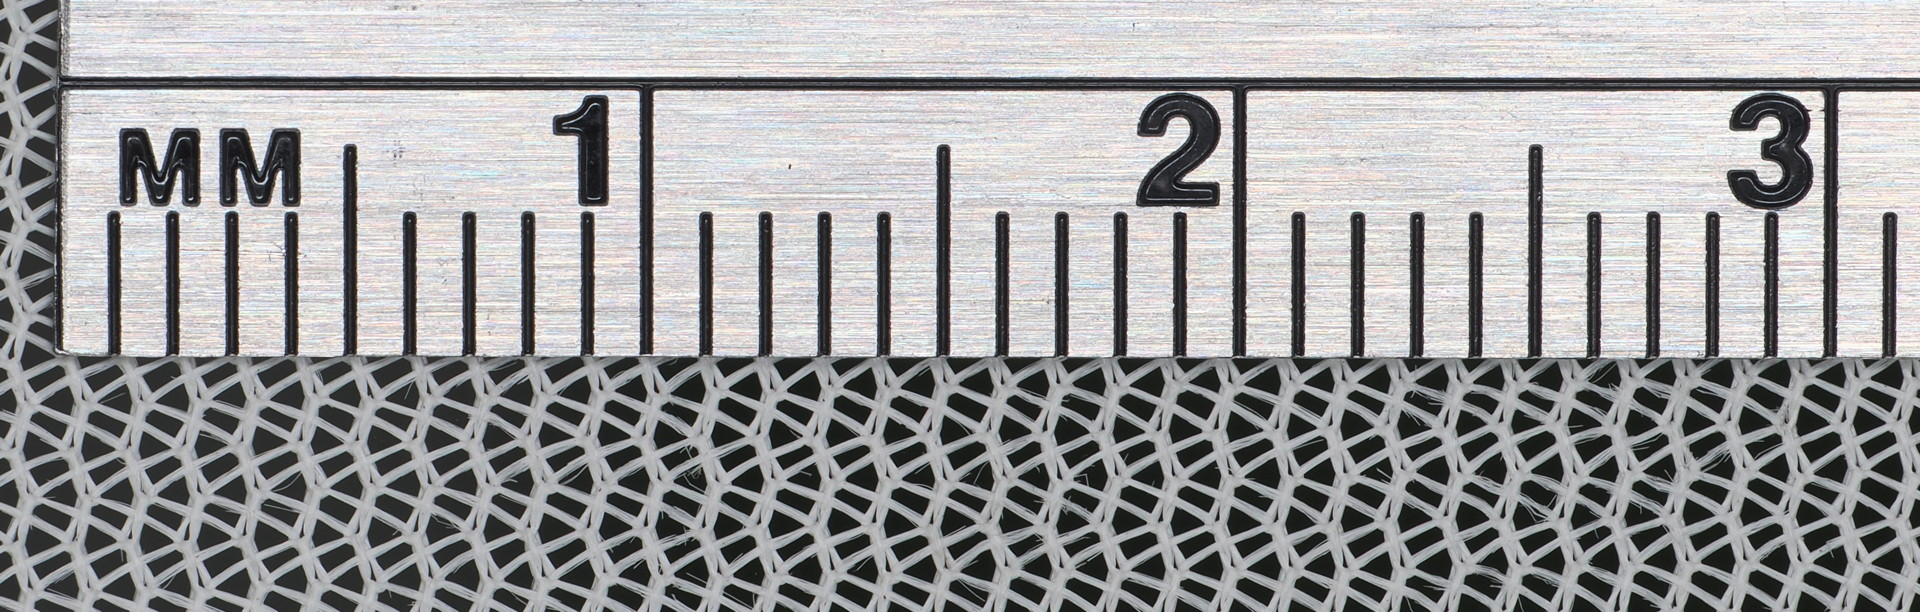
Above is a photo of our screen mesh next to a mm ruler. The separation between the main bands of polyester fiber is very close to 1 mm.
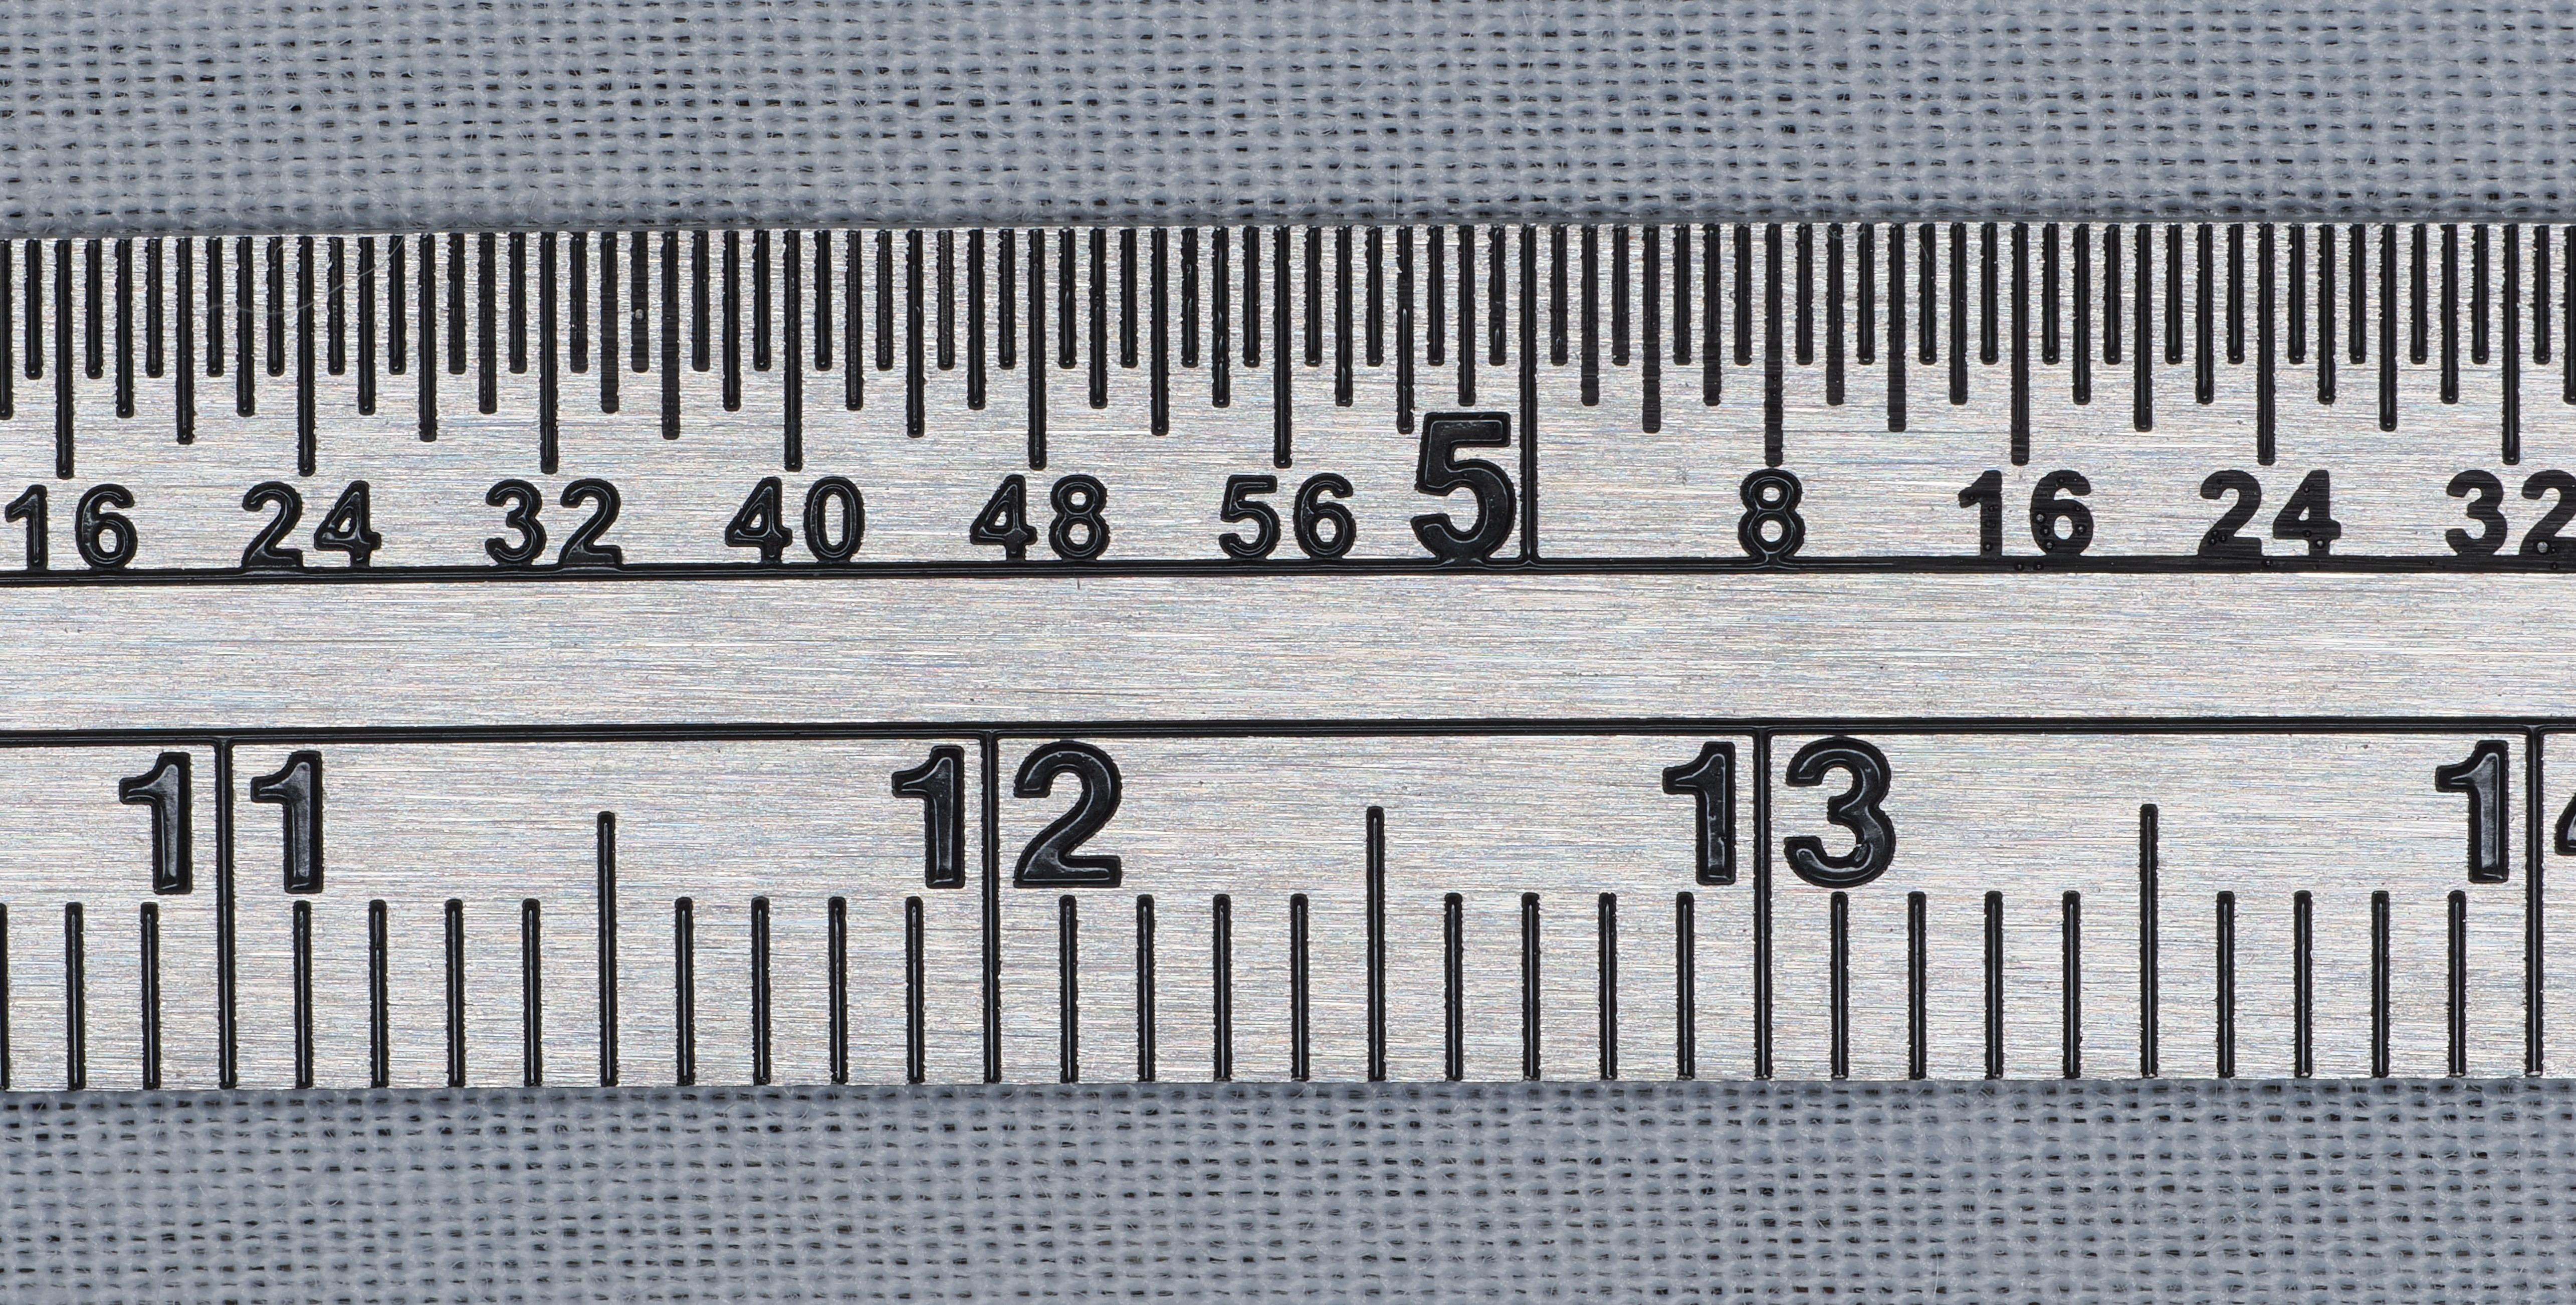
A cotton sheet that we sometimes use has a different mesh, the scale is below. The cotton sheet appears to have threads very close to 1/64th inch apart (the upper scale is in 64th of an inch). It is about 2.6threads per mm (bottom scale is in mm).
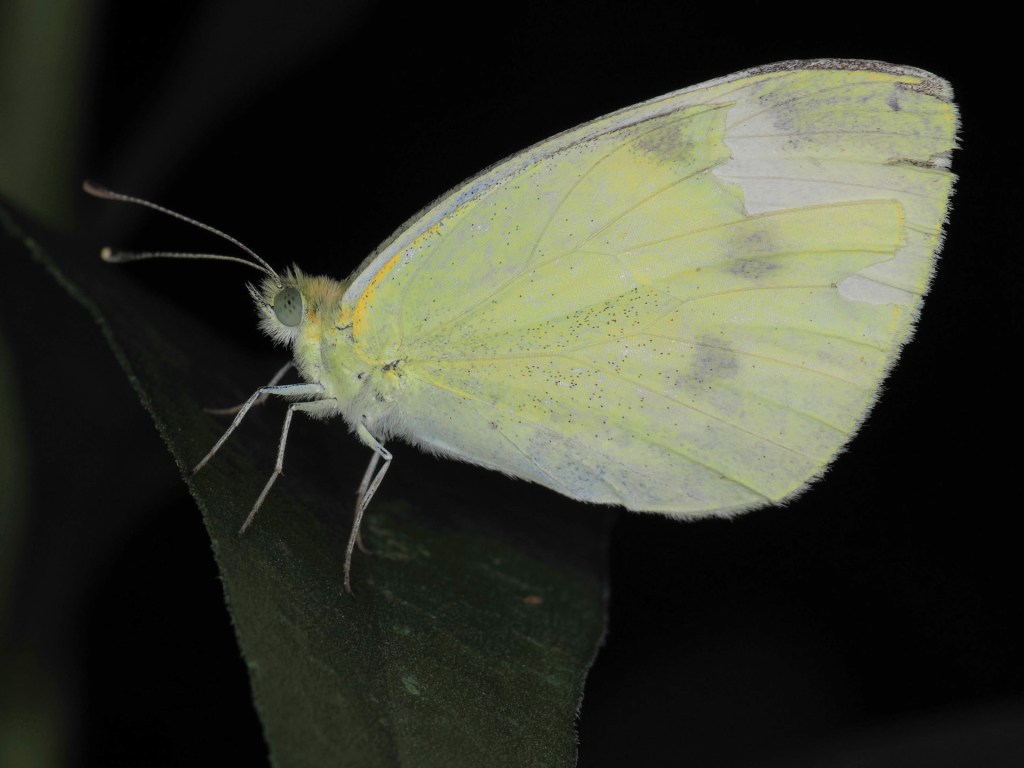
An example of what an insect photo “should” look like – without a distracting mesh, is shown below. We have all seen such photos, but they require some guesswork to estimate the actual size of the subject.
Unfortunately, the long use of UV lights can stress insects and many smaller ones can die as a result of a night’s mothing activities. We turn off our lights when we are done photographing what comes, usually after a couple of hours. One quickly discovers what tends to come night-after-night and which insects are only rarely seen. Routine observations at a particular location will provide details about the seasonality of insects and how their appearance may be related to variations in the meteorological conditions. Warmer weather brings out more insects than cooler weather, and tropical locations, for a variety of reasons, have the greatest insect diversity.
Our procedures for moth photography are a result of our camping activities where we tend to move relatively frequently, with no more than a few days in most locations. Very often it is only one night. The speed of set-up is crucial for such travels, but for those who spend many nights at a particular campsite the speed of set-up may not be as critical. The need for being unobtrusive with camping neighbors remains, so using dimmer UV lights is often essential to avoid attracting unwanted attention (by campground neighbors, hosts, and park rangers).
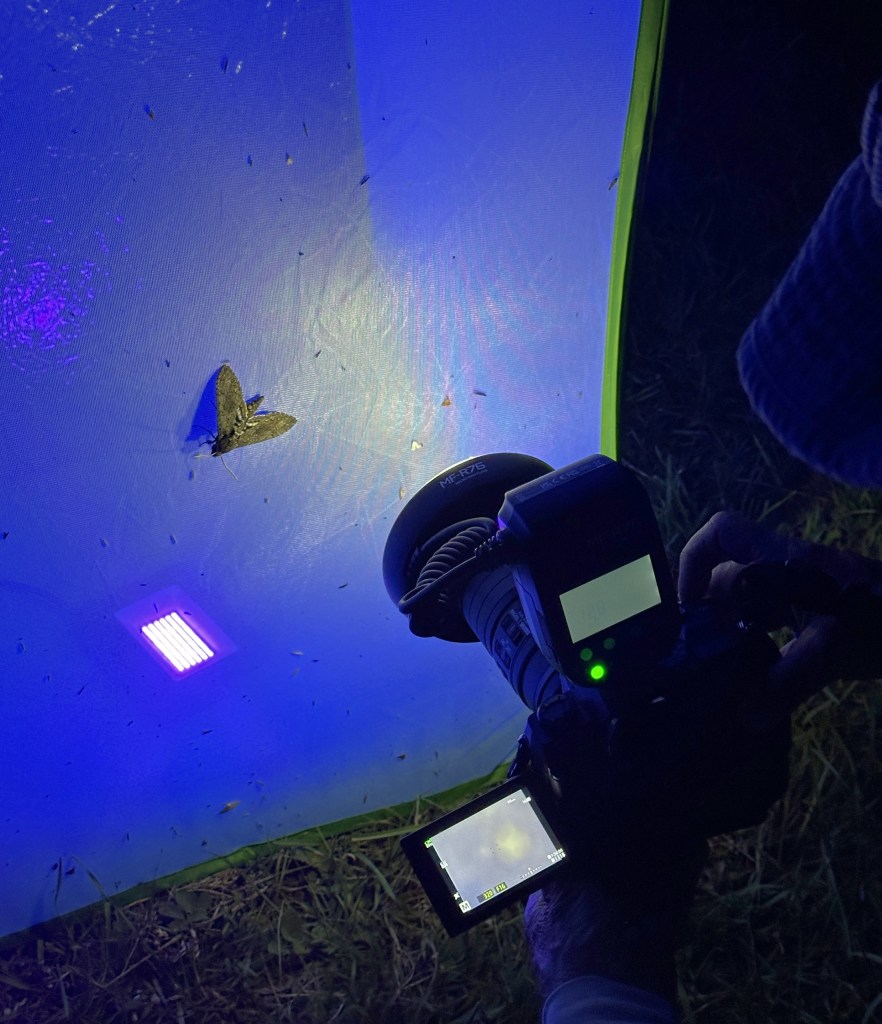
Eyeballing the camera so that the sensor is parallel to the long part of the insect, in this case a moth. The orientation of the ring flash helps to visualize this.
Some photographic challenges
When photographing insects – especially those with large wings, it is very important to have your camera’s image sensor parallel to the wings – as much as feasible. Is is to maximize the amount of the insect that is acceptably sharp. The depth-of-field is very shallow in macro photography. One has to judge the orientation of the insect’s body – it is not always parallel to the sheet it is resting on.
With flash, it is possible to use the minimum lens aperture (commonly F22 or thereabouts) to obtain the greatest range of sharpness. But diffraction effects reduce the sharpness somewhat at the smallest aperture settings, so I tend to shoot closer to F16 as a default. I manually adjust the ring flash’s brightness to get an acceptable illumination. Too much light washes out colors and too little is too dark. Dark beetles require more illumination to bring out details compared with light-colored moths. Fortunately, most stationary insects (but not all) will permit multiple shots without moving. Of course, many insects do move, and these are a challenge to photograph.
Getting it all in, yet with enough detail
Some insects have very long antenna and if you take a photo of the entire insect than you may not have enough detail on other important parts of the body for identification to species. Remember, the goal of photography for iNaturalist is to show enough detail to unambiguously identify what you are photographing. The solution is to take multiple photos, from different angles and distances, to show most of the subject. Often the ventral side (bottom) of the insect is hard to see and photograph, but side and dorsal views should be possible.
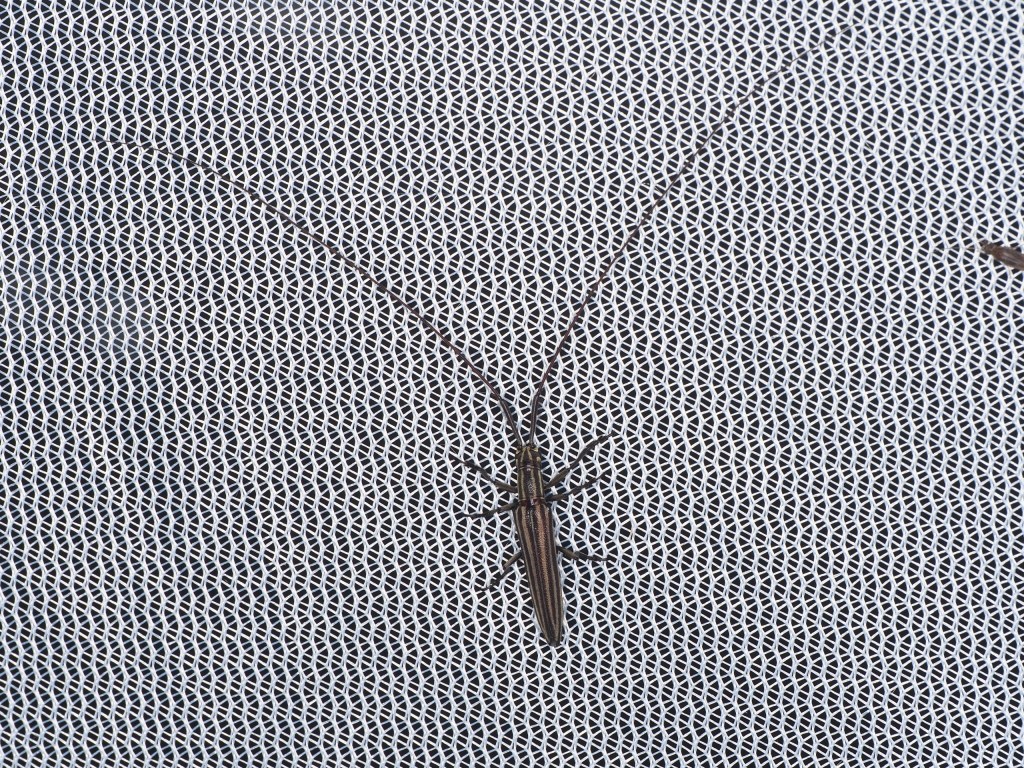
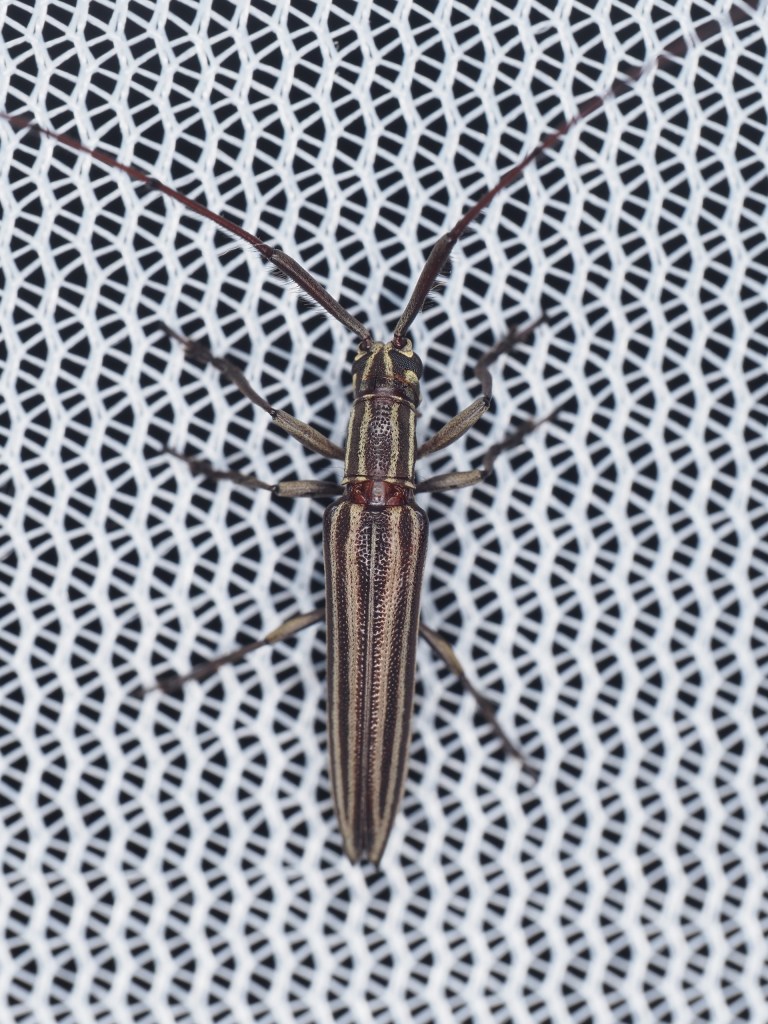
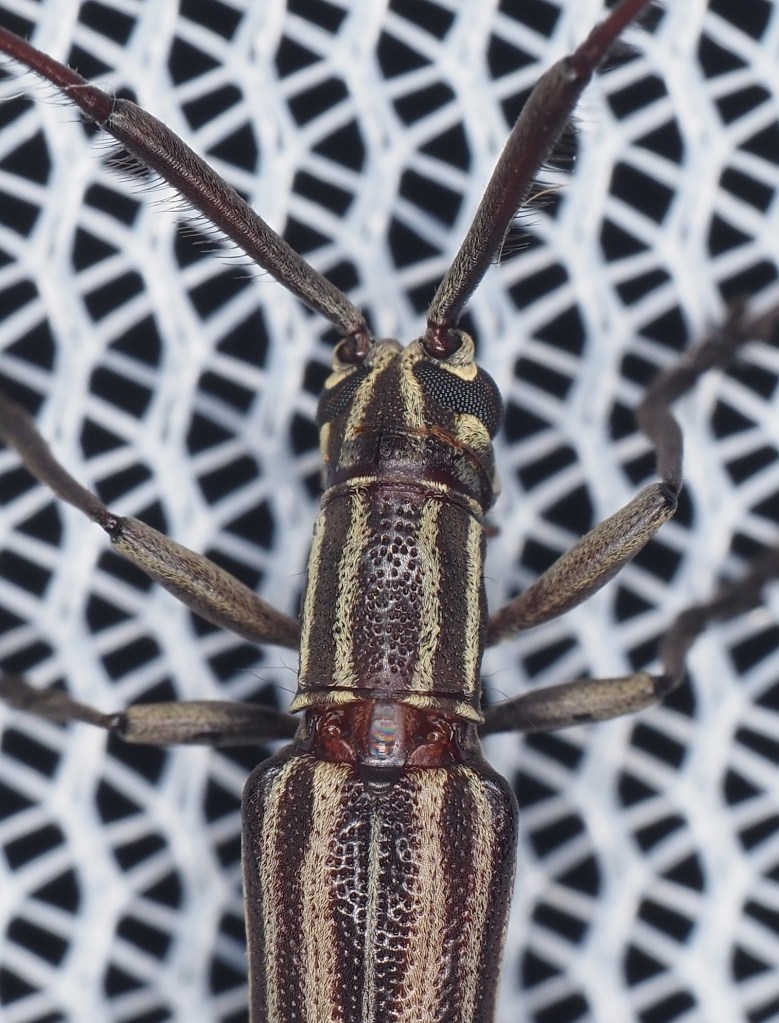
This Long-horn Beetle has very long antenna and the image on the left is required to capture them. But the beetles body detail is hard to discern so a closer view is needed. The middle image is actually only 2560 pixels up-down, so a crop of the original image (right) shows the details possible.
Important details about photos for iNaturalist
iNaturalist had, and still has, limits on the file sizes of images submitted to it. Twenty megabytes for the file size and more importantly, images that are not any larger than 2048 pixels in the longest dimension. So if your original image is 5000 pixels across, iNaturalist will downscale it so that the longest dimension is 2048 pixels. With modern digital cameras having sensors that provide images with 5000 or more pixels across, essentially every image is now downsized by 50% or more. We cannot criticize iNaturalist for this – they now receive more than 5 million observations a month, and at 1 MB per image this is 5 TB per month. There is also access time – the larger the images the longer the download and upload times.
Because iNaturalist doesn’t store the original images you submit at full resolution it is important that you keep your submitted full resolution images elsewhere. Researchers may at a future date want to use such images and it is best if they have access to the full resolution versions if needed.
The problem with limited file sizes in iNaturalist is that some information is lost in the downsizing from a file with 5000 pixels across to one with 2000 pixels across. For identification we want the highest resolution images possible for reviewers to see – if we want an accurate identification. For many subjects this might not be important – a bison or elephant filling the image will be identifiable even if the image is shrunk to a few hundred pixels across. But this is not the case for many insects, where differences between species may be subtle. Let us consider some solutions that have been discussed in iNaturalist forums and on their main pages, but few I suspect have looked at.
Crop your images to show just what you want to have identified
Too many iNat submissions show a small subject surrounded by lots of unnecessary space. This is especially true for most bird and many insect photos. By cropping the image to just the subject to be identified you can be more assured that the image will not be resized to the 2048 pixel limit. See the example below.
Above: The original image of a beetle (left) and a suitable crop (right) that ensures that the most detail of the original image is retained when in is submitted to iNaturalist.
Below: A comparison of the original image shrunk to 2048 pixels across then magnified to be the same size as the crop of the beetle that was also shrunk to 2048 pixels. The cropped first image is on the right side – and more detail is evident in the antenna and scales on the head. Not a huge difference, but you don’t know what is crucial information beforehand. Note: You need to click on the image below to see the differences! (In this example they aren’t that obvious.)
A problem with cropping images is that this may not be easy to do on a smart phone, and most iNat submissions are via smartphones – for the purpose of “instant” identification. Cropping is feasible when processing images on a desktop or laptop computer with software for image manipulation, but only more dedicated iNat observers do this.
Adjust brightness and contrast if needed
Many images taken of insects are dark, and it helps if they are brightened via the levels command. Different image processing software have different versions of such procedures. An example is below.
Take multiple photos from different angles
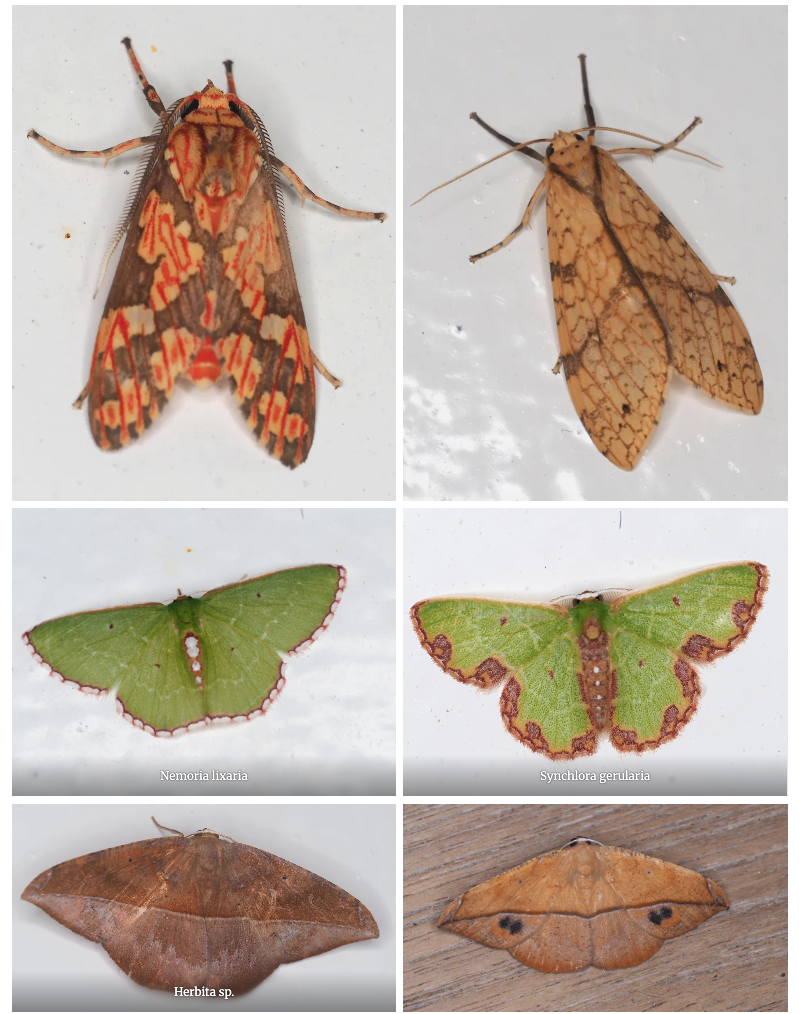
A non-specialist will not likely know what part of an insect is most crucial to see in order to identify it correctly. For this reason it is best to take multiple photos at different angles to show different features of the insect. One example is shown below (see better images on our Amazon moth web page).
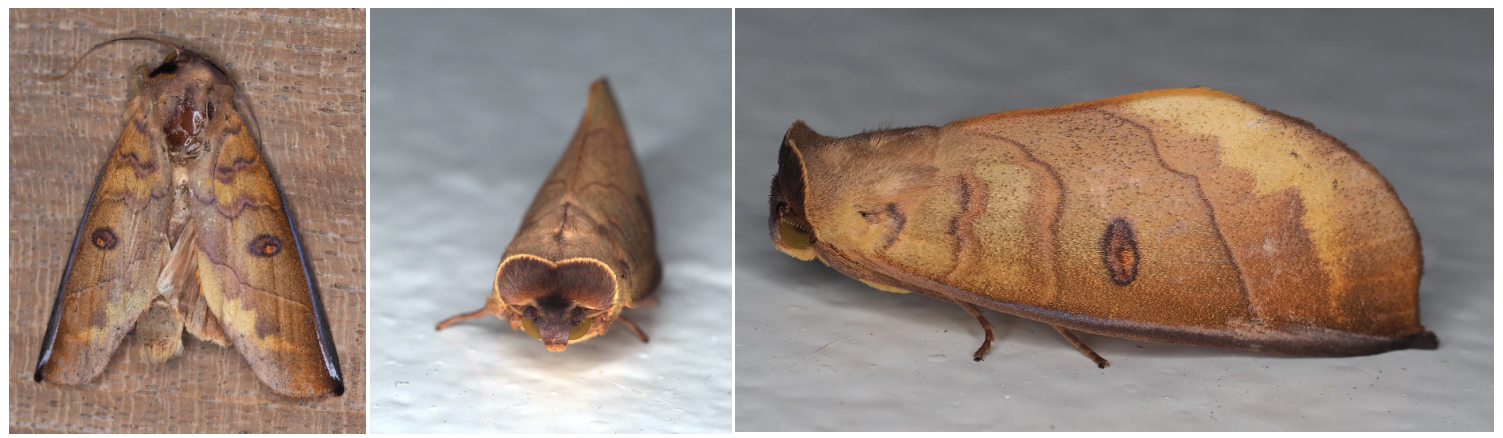
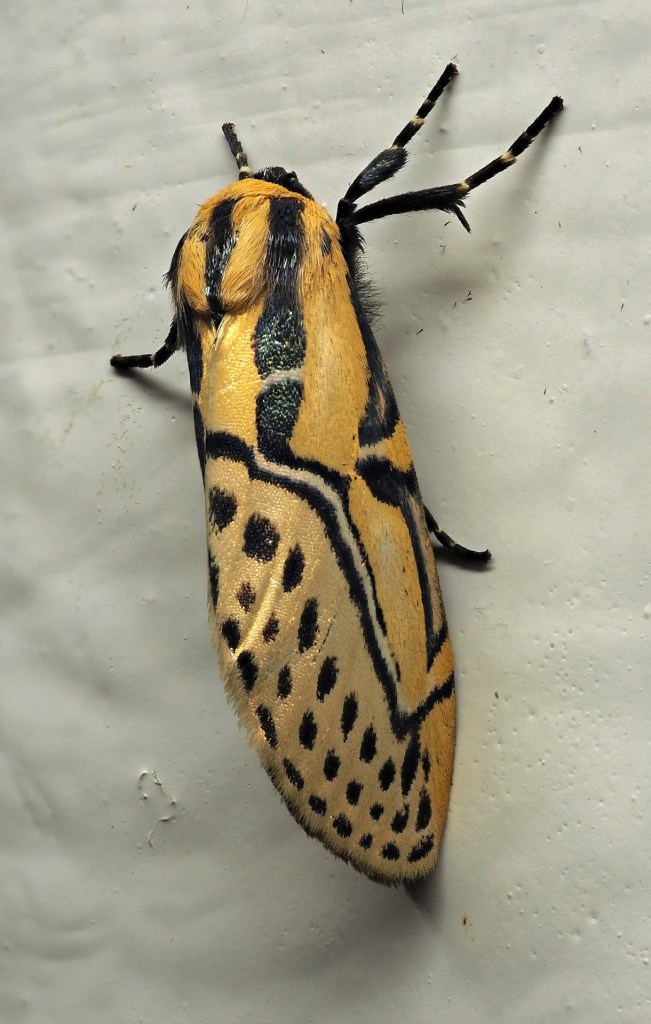
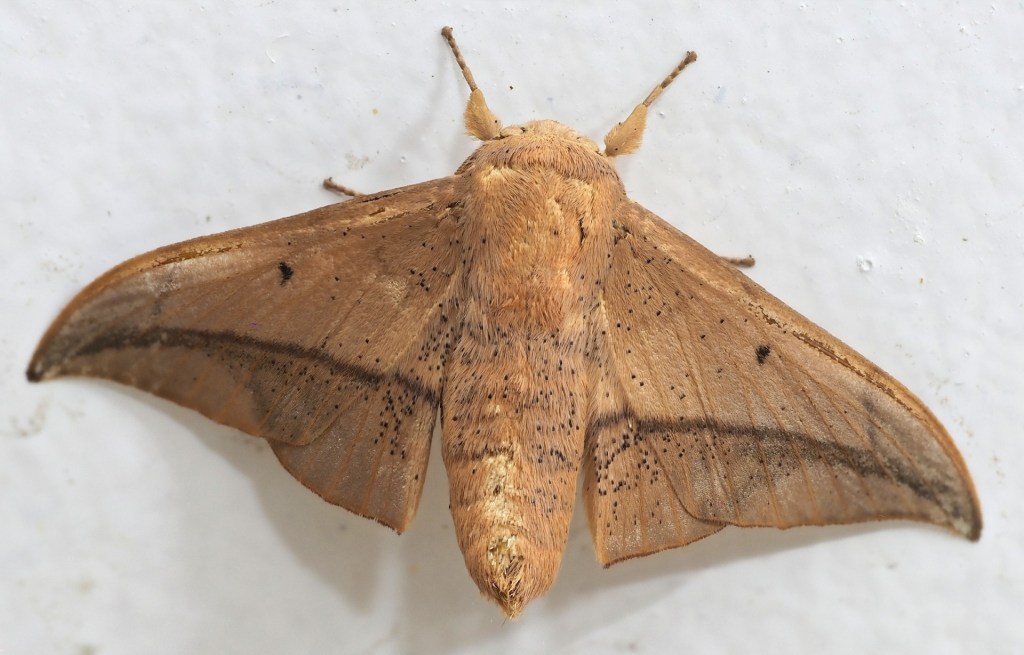
Amd the importance of side views as well as dorsal views:
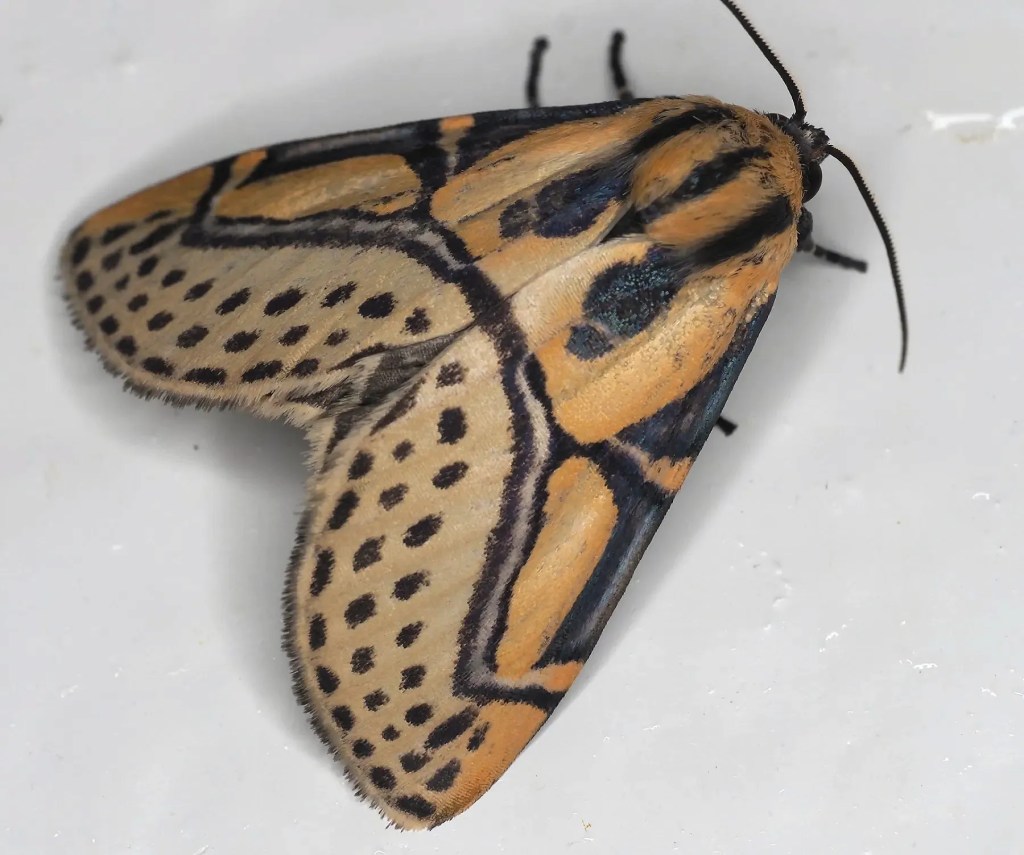
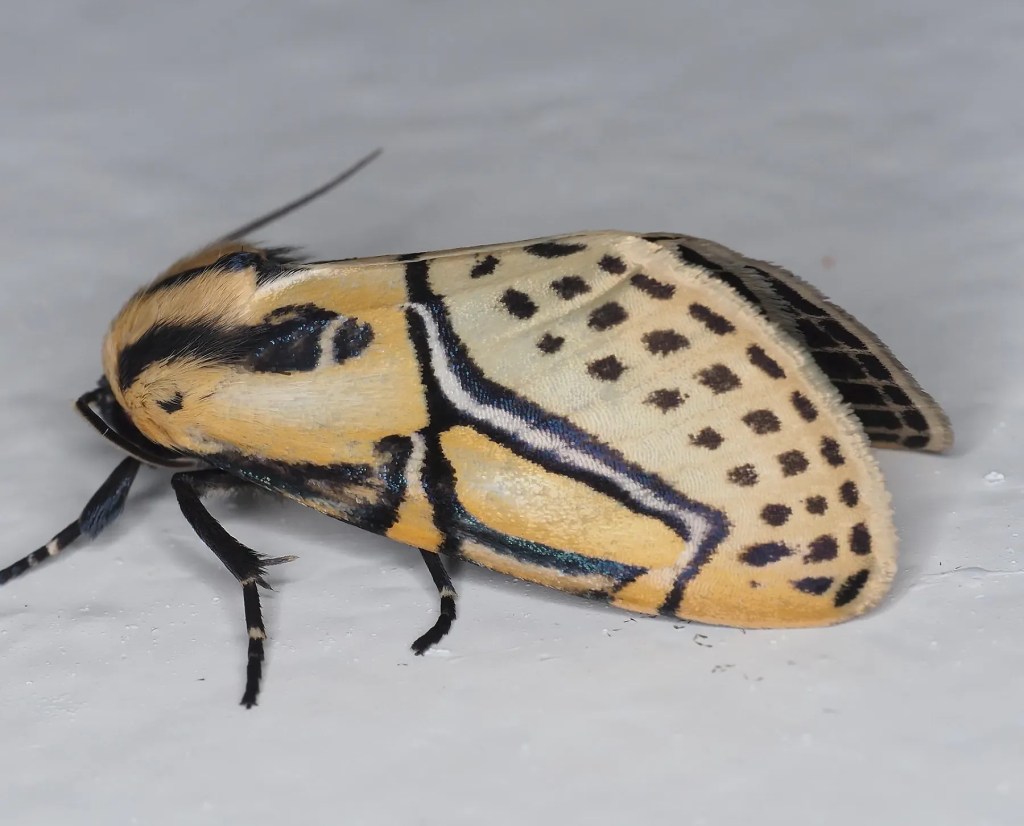
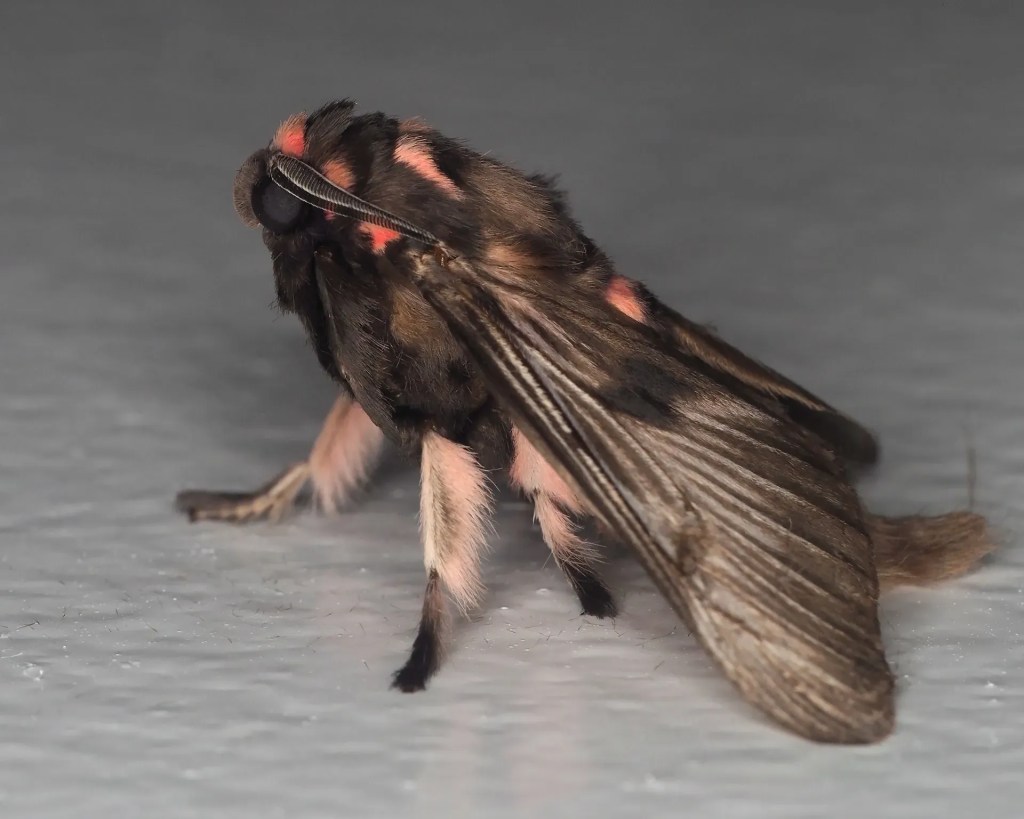
Top views of moths on the left and side views on the right. Both show different details of the insect that may be important in proper identification.
Check that your photos are in focus
When there are many insects in front of you at a UV-illuminated sheet at night there is the temptation to quickly move from one insect to another – taking a few photos of each – without checking whether they are in focus in critical parts that you want to illustrate. To check focus you have to look at the image you have just taken – and magnify it to the maximum on your screen to see if it is sharp. This doesn’t take too long to do, but in the dark, and collectively over an evening photo shoot, it adds up to fewer subjects photographed. So many people (myself included) tend to skip this check. As it is, on our OM-1 camera the button to select image preview is small and in the dark, almost invisible.
The problem with not verifying that your photos are as good as possible in real-time is the following. You come back after your night’s activities, download your photos, look at them on a larger monitor – and only then discover that the new beetle or moth you saw was not really in focus! It is too late to go back and photograph it again. That may be tolerable if your photo shoot was in your backyard or a nearby park, but what if were during a quick-paced international trip? Or if the insect in question only appears for a short period during one month?
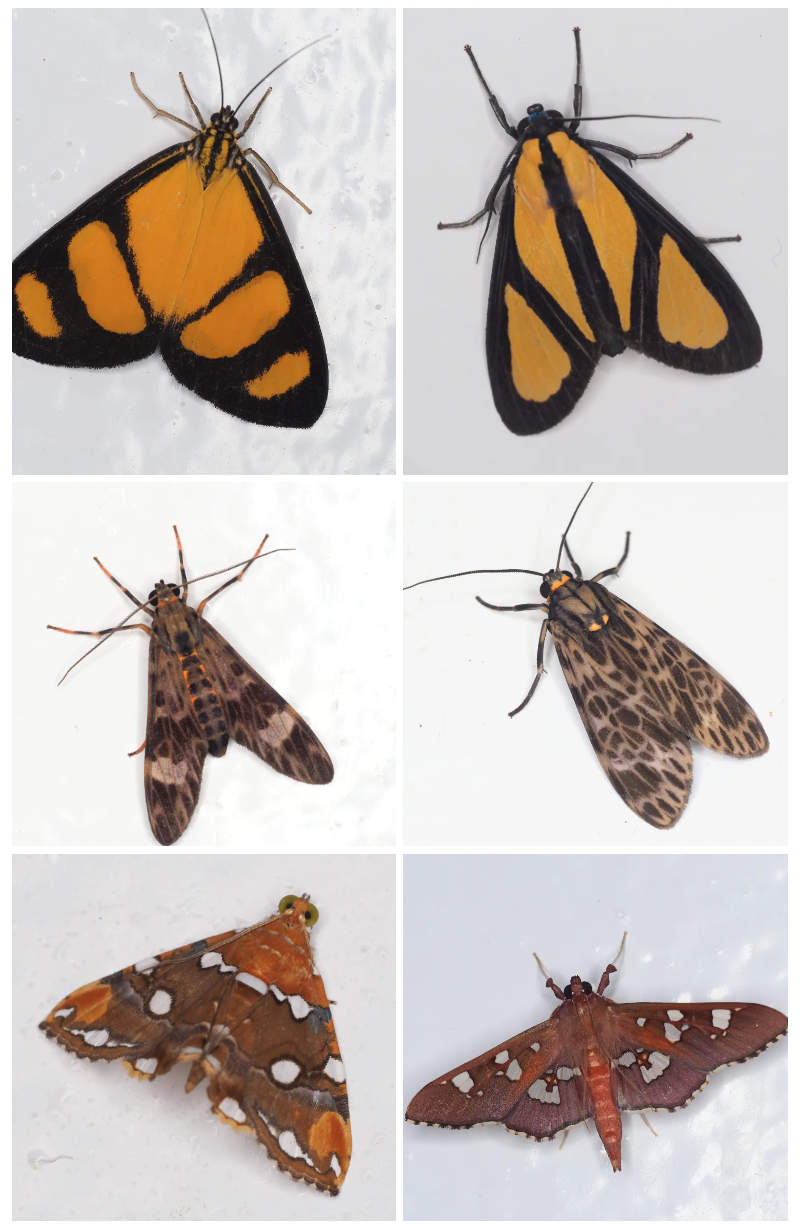
Assuming you already have photographed an insect earlier in the night
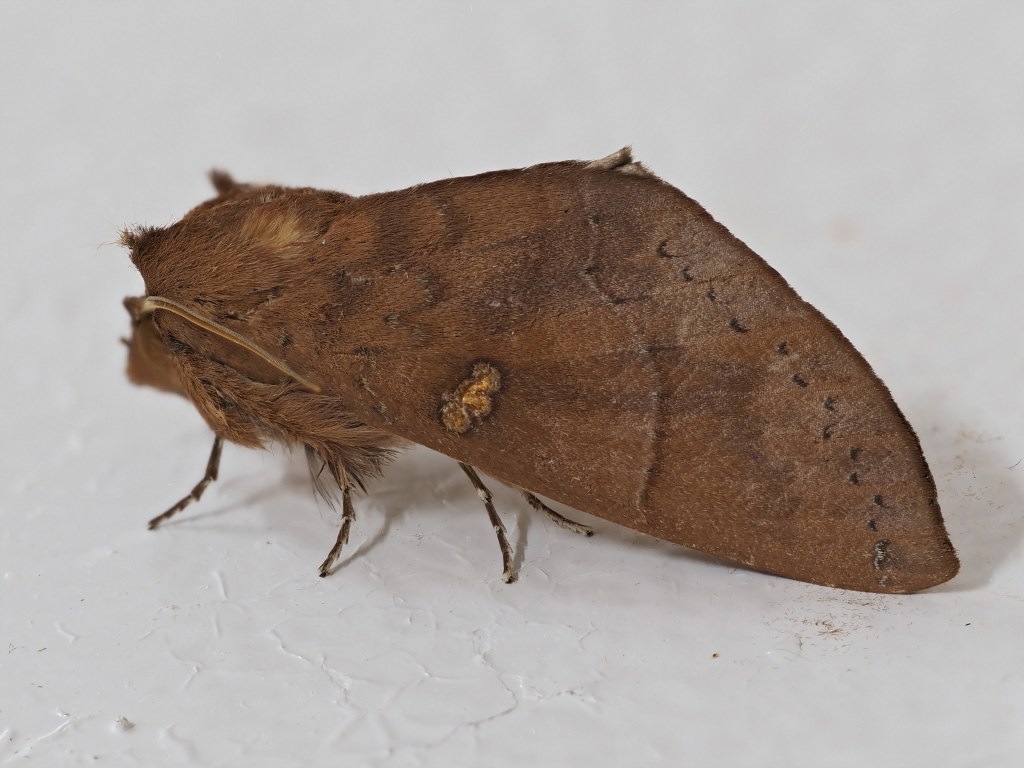
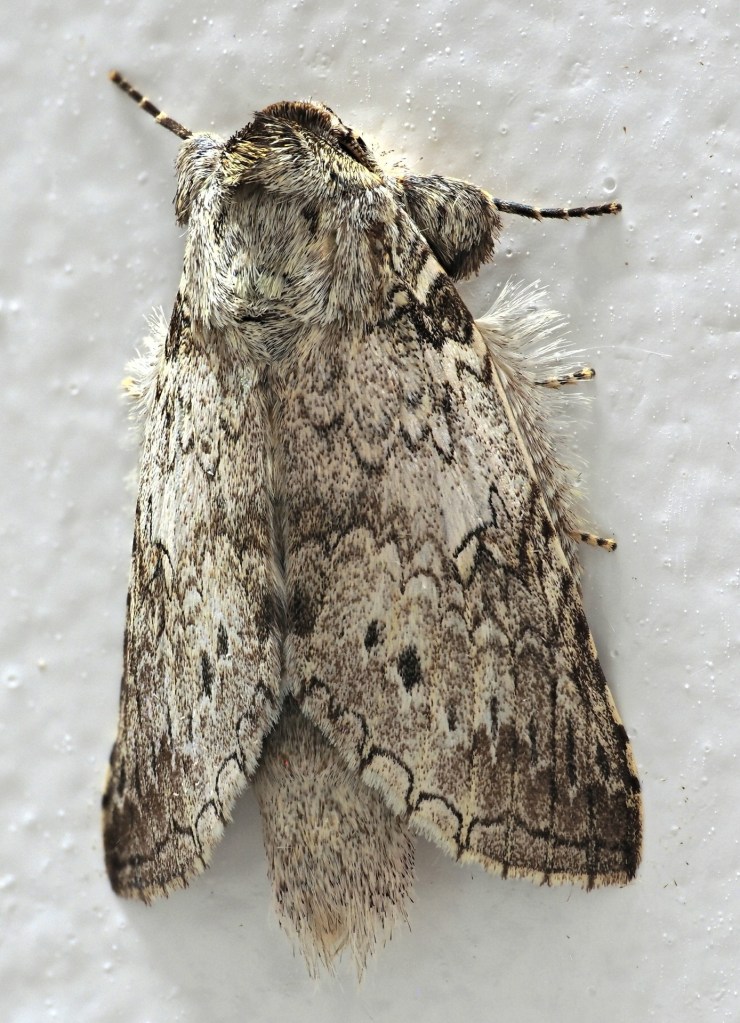
If you have been photographing insects for a few hours it will be nature to be unsure if you are photographing the same insects over and over, or if there are difference between the ones you saw earlier in the evening with those that have recently come. (Not all insects stay at the lights all night.). Unless two insects that you think are the same are next to one another, it may be hard to judge if they are the same. The panels below show moths photographed on an Amazon cruise over an 8-day period. They are arranged to show similar species that might be confused as being the same – if seen on different nights or on different parts of the ship. When placed side-by-side the differences are apparent. So when in doubt take photos – it doesn’t cost more (except in time).
Dead Insects
Many, perhaps most, iNaturalist contributors don’t want to kill any organisms – even in “the name of science”. But museums require specimens for proper classification and many insects have short lives. However, for those not willing or unable (in many countries permits are required) to collect live specimens there are usually dead insects that can be found around the UV lights after a session. These can be collected and then photographed in a more controlled setting. Or, if collecting specimens is not a personal concern you can always collect what you want to photograph, then chill them to reduce their activity, then photograph them, then release them). Either way, better photos are possible via the next step – image stacking.
Image Stacking for greater depth-of-field
Assuming your insect is either dead or cold enough so that it doesn’t move over a period of a couple of seconds, you can do image “stacking” to get all parts of the insect in focus. A handful of cameras now allow this to be done in the camera, though the maximum number of images that can be processed is limited to something like 10-15. Your camera needs to be mounted on a tripod and the insect placed below (most commonly). A steady light source is best. Then, when you press the shutter release button on your camera it takes one photo, then changes the focus very slightly and takes another photo. It can do this for up to 10-15 photos if you want to see the result processed in the camera, or, if you just want to process the images later you can take literally hundreds (999 in my OM-1 camera). The idea is that the camera software (or your computer’s image stacking program) will merge the images taken so that one obtains a much greater depth-of-field than possible from only one image.
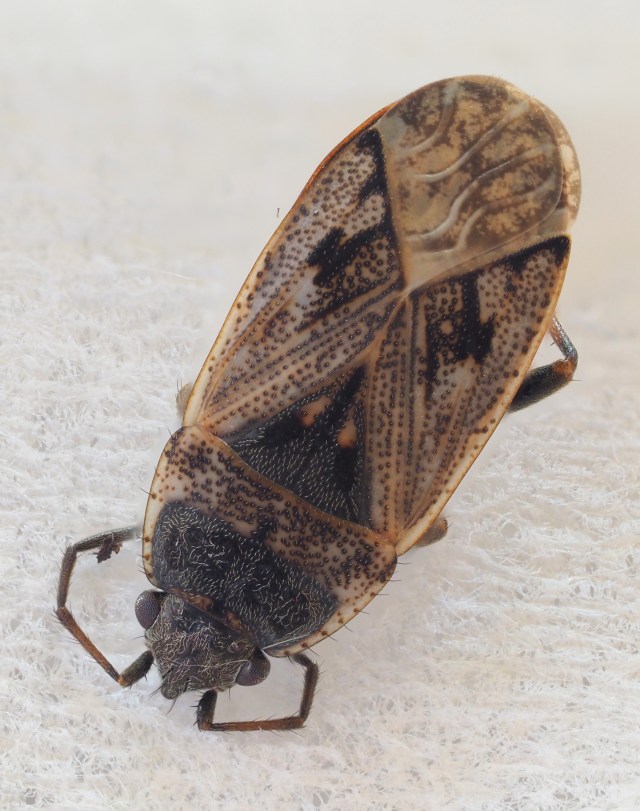
Images above show differences between a focus-stacking of many images (left) and an individual flash image shot at f 16 (right). Both have been reduced in size, click to see somewhat larger views.
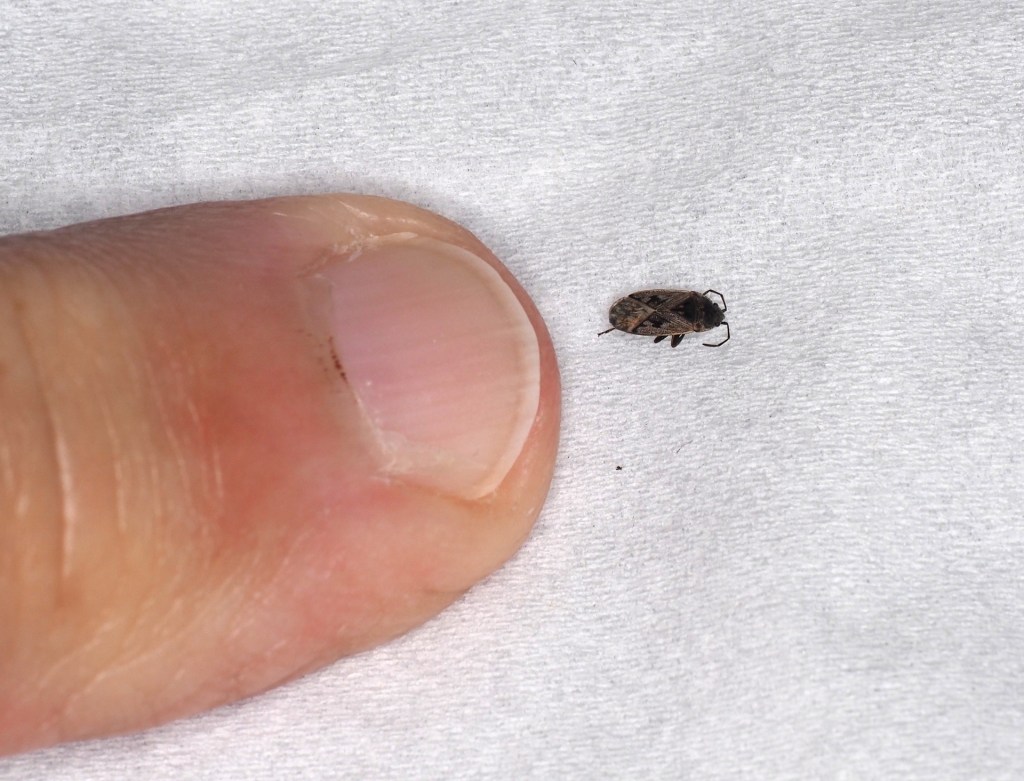
By the way, the size of the insect above (a true bug) can be appreciated in the image below with my index finger for scale.
In-camera focus stacking can be hand held, but if there is too much movement the camera will indicate an error. At least this is with Olympus cameras. The reason this is possible at all is that the area of the image used for stacking isn’t the entire image shown in the viewfinder, but a somewhat smaller area to account for small hand movements over the second or two it takes to capture the images to be stacked.
The key to successful image stacking is that the subject cannot move and that you set the stacking adjustment to get enough images so that several images are in focus on any part of the subject. Lighting is also important to highlight subtle textures in the subject.
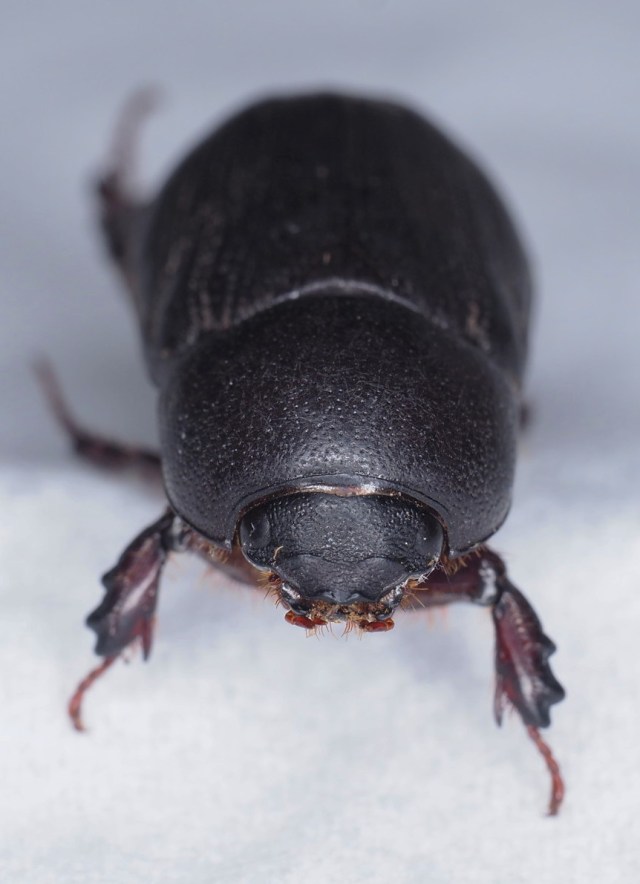
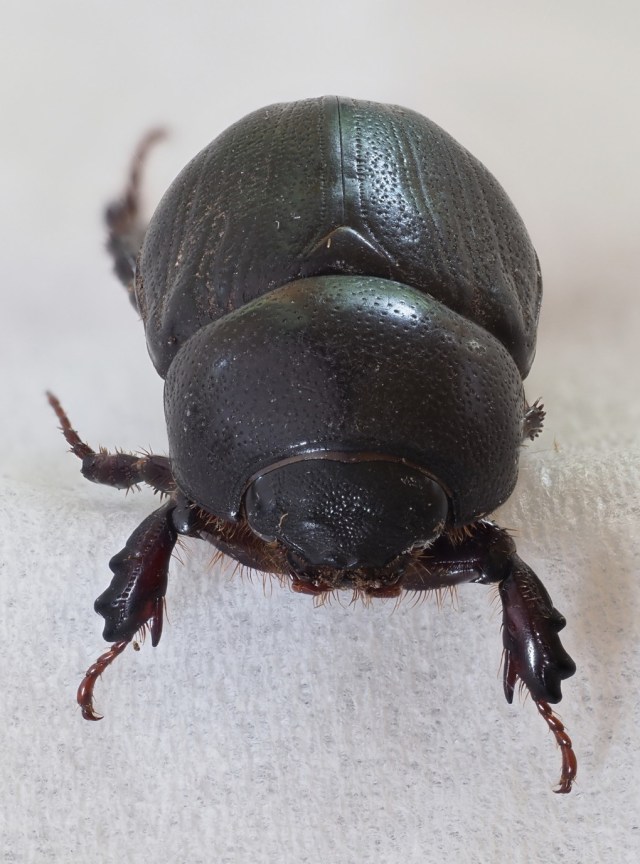
In the images above the f13 single image of the beetle is on the left and a multi-image focus stacked image is on the right (with much greater depth of field). The lighting is somewhat different.
A better comparison between a single image, taken at f18, and one that is stacked with 36 images at f10 is shown below.
On left is the focus stacked image made using 36 individual images, each at a slightly different focus, and a single f18 image. This comparison shows the much greater depth-of-field possible with the focus-stacking technique. Fewer than 36 images would have produced essentially the same result – there are various settings that are adjustable in the camera prior to shooting the sequence of images. The actual time it takes to shoot the sequence depends on the lighting, but is usually a few seconds at most. The subject should not move in this time – hence the applicability of this technique mostly is to dead organisms or plants that don’t blow in the wind.
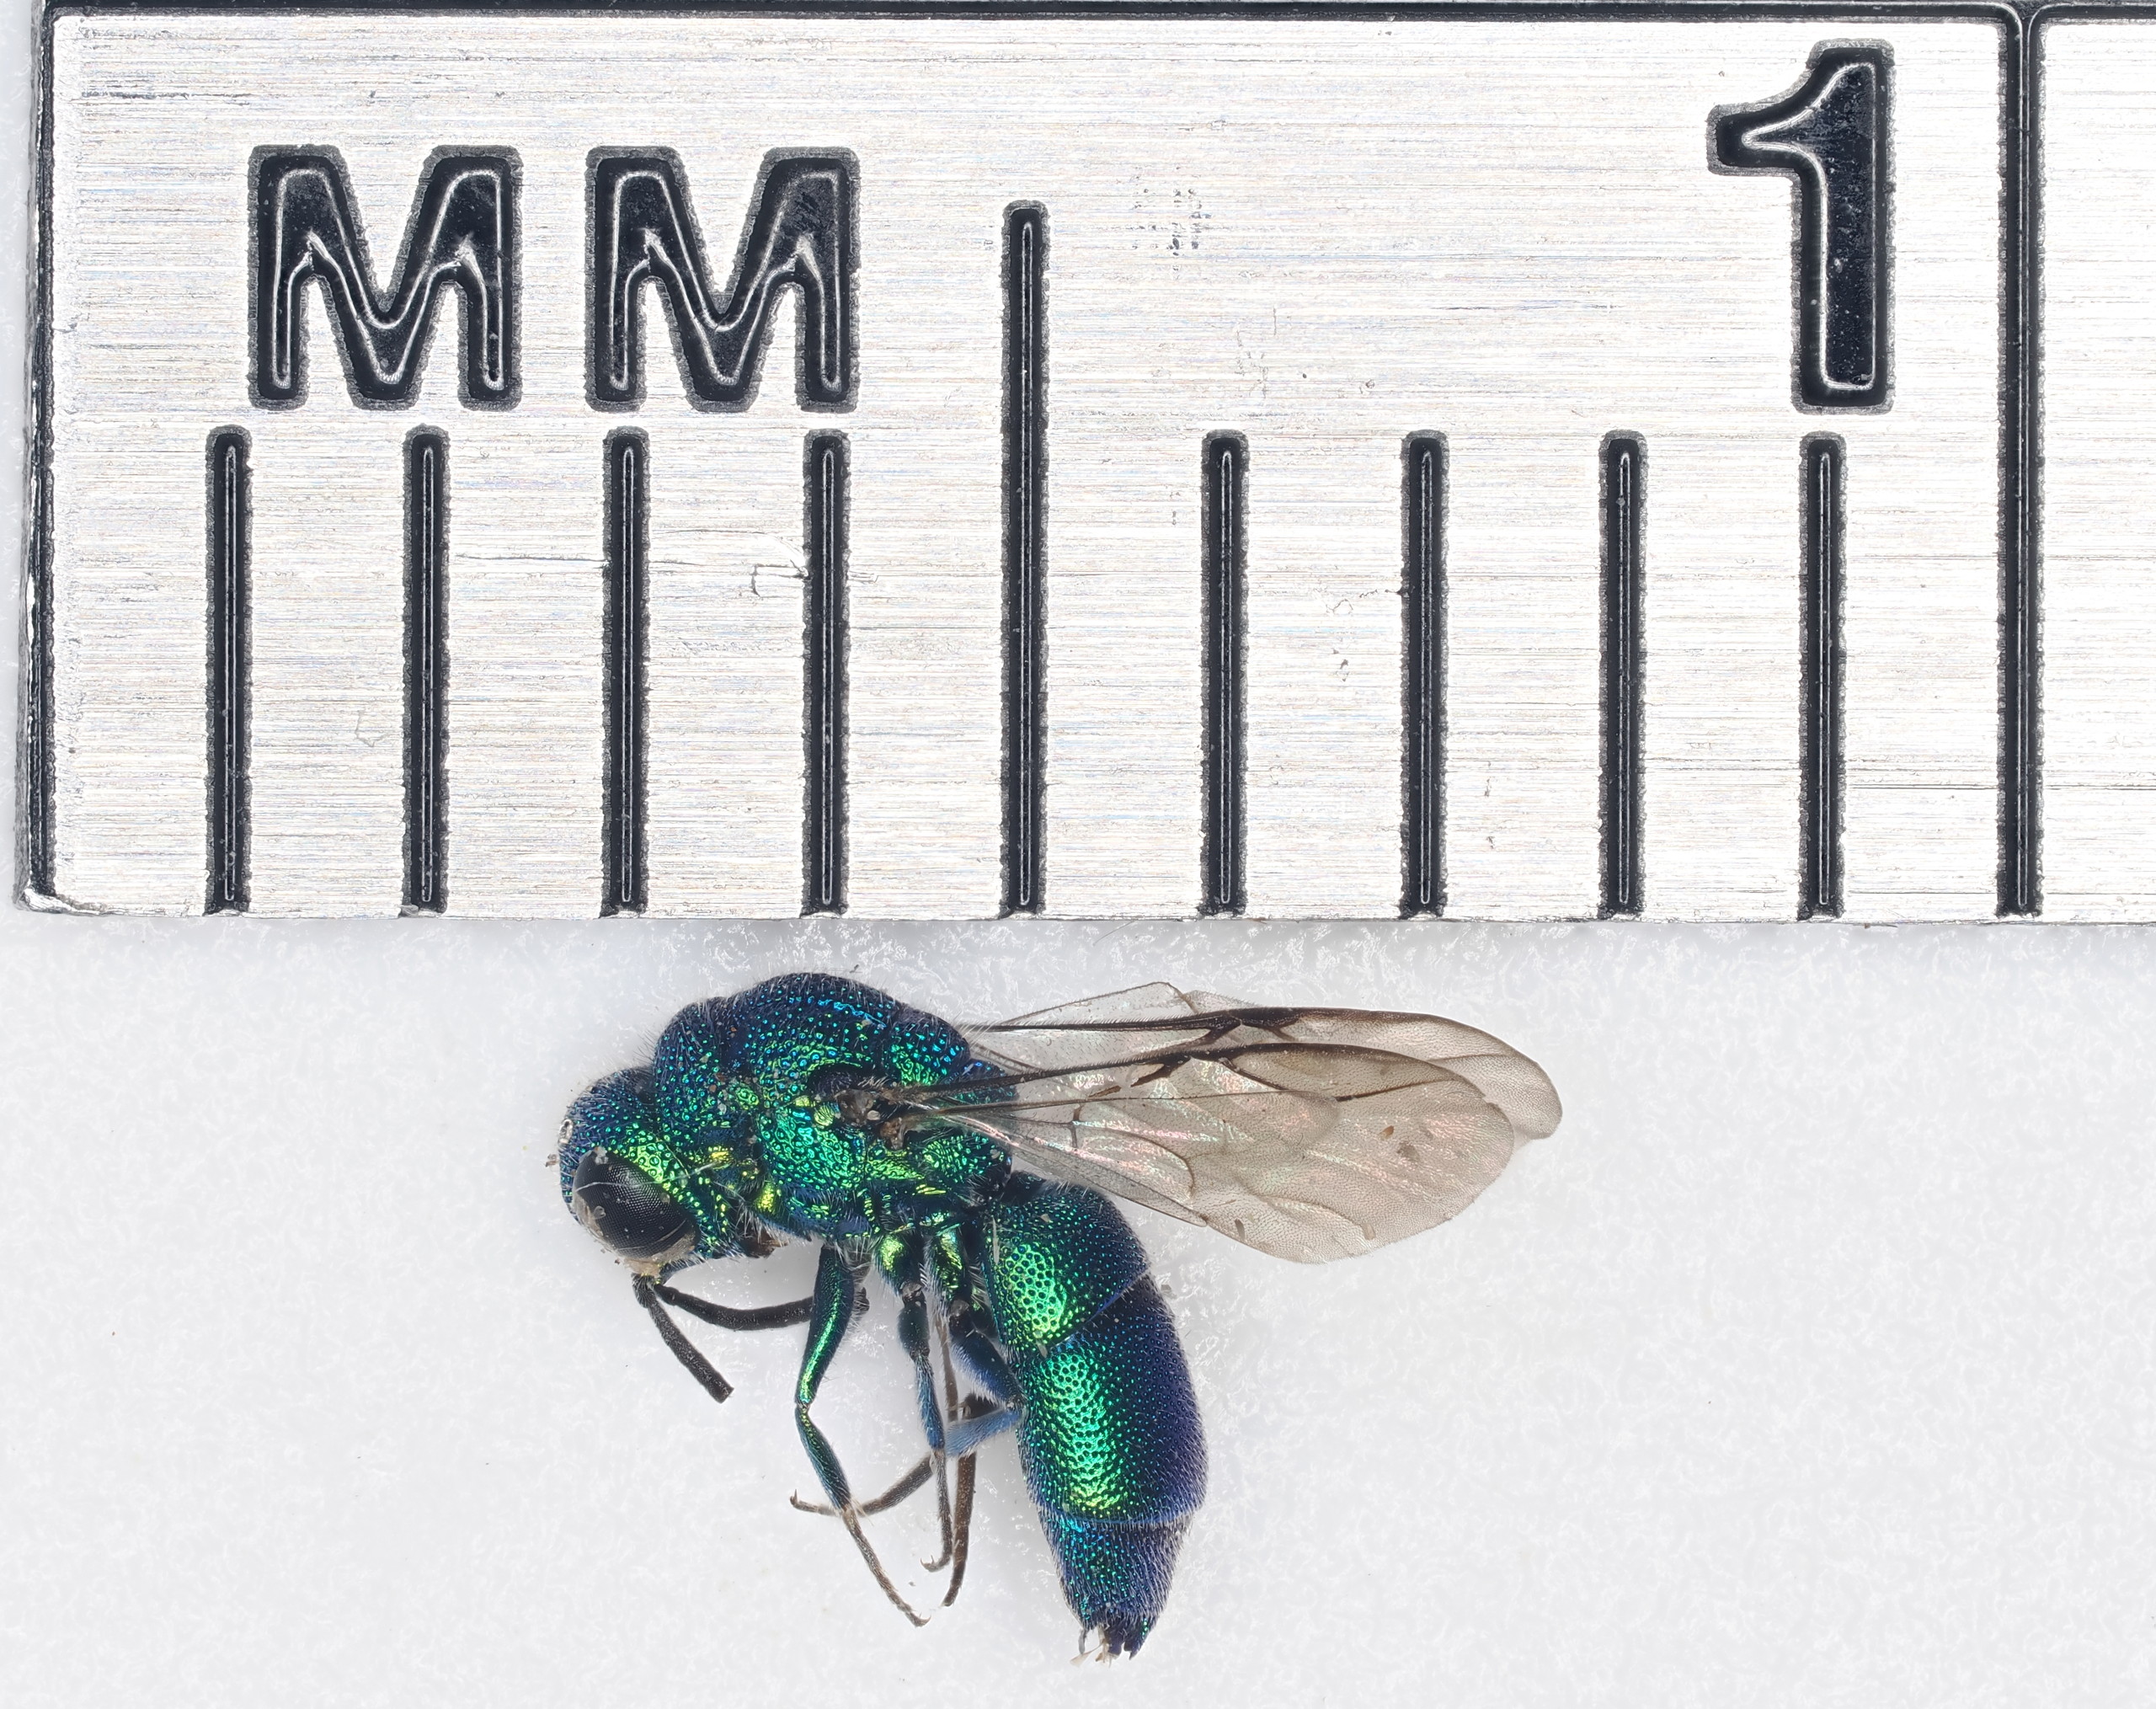
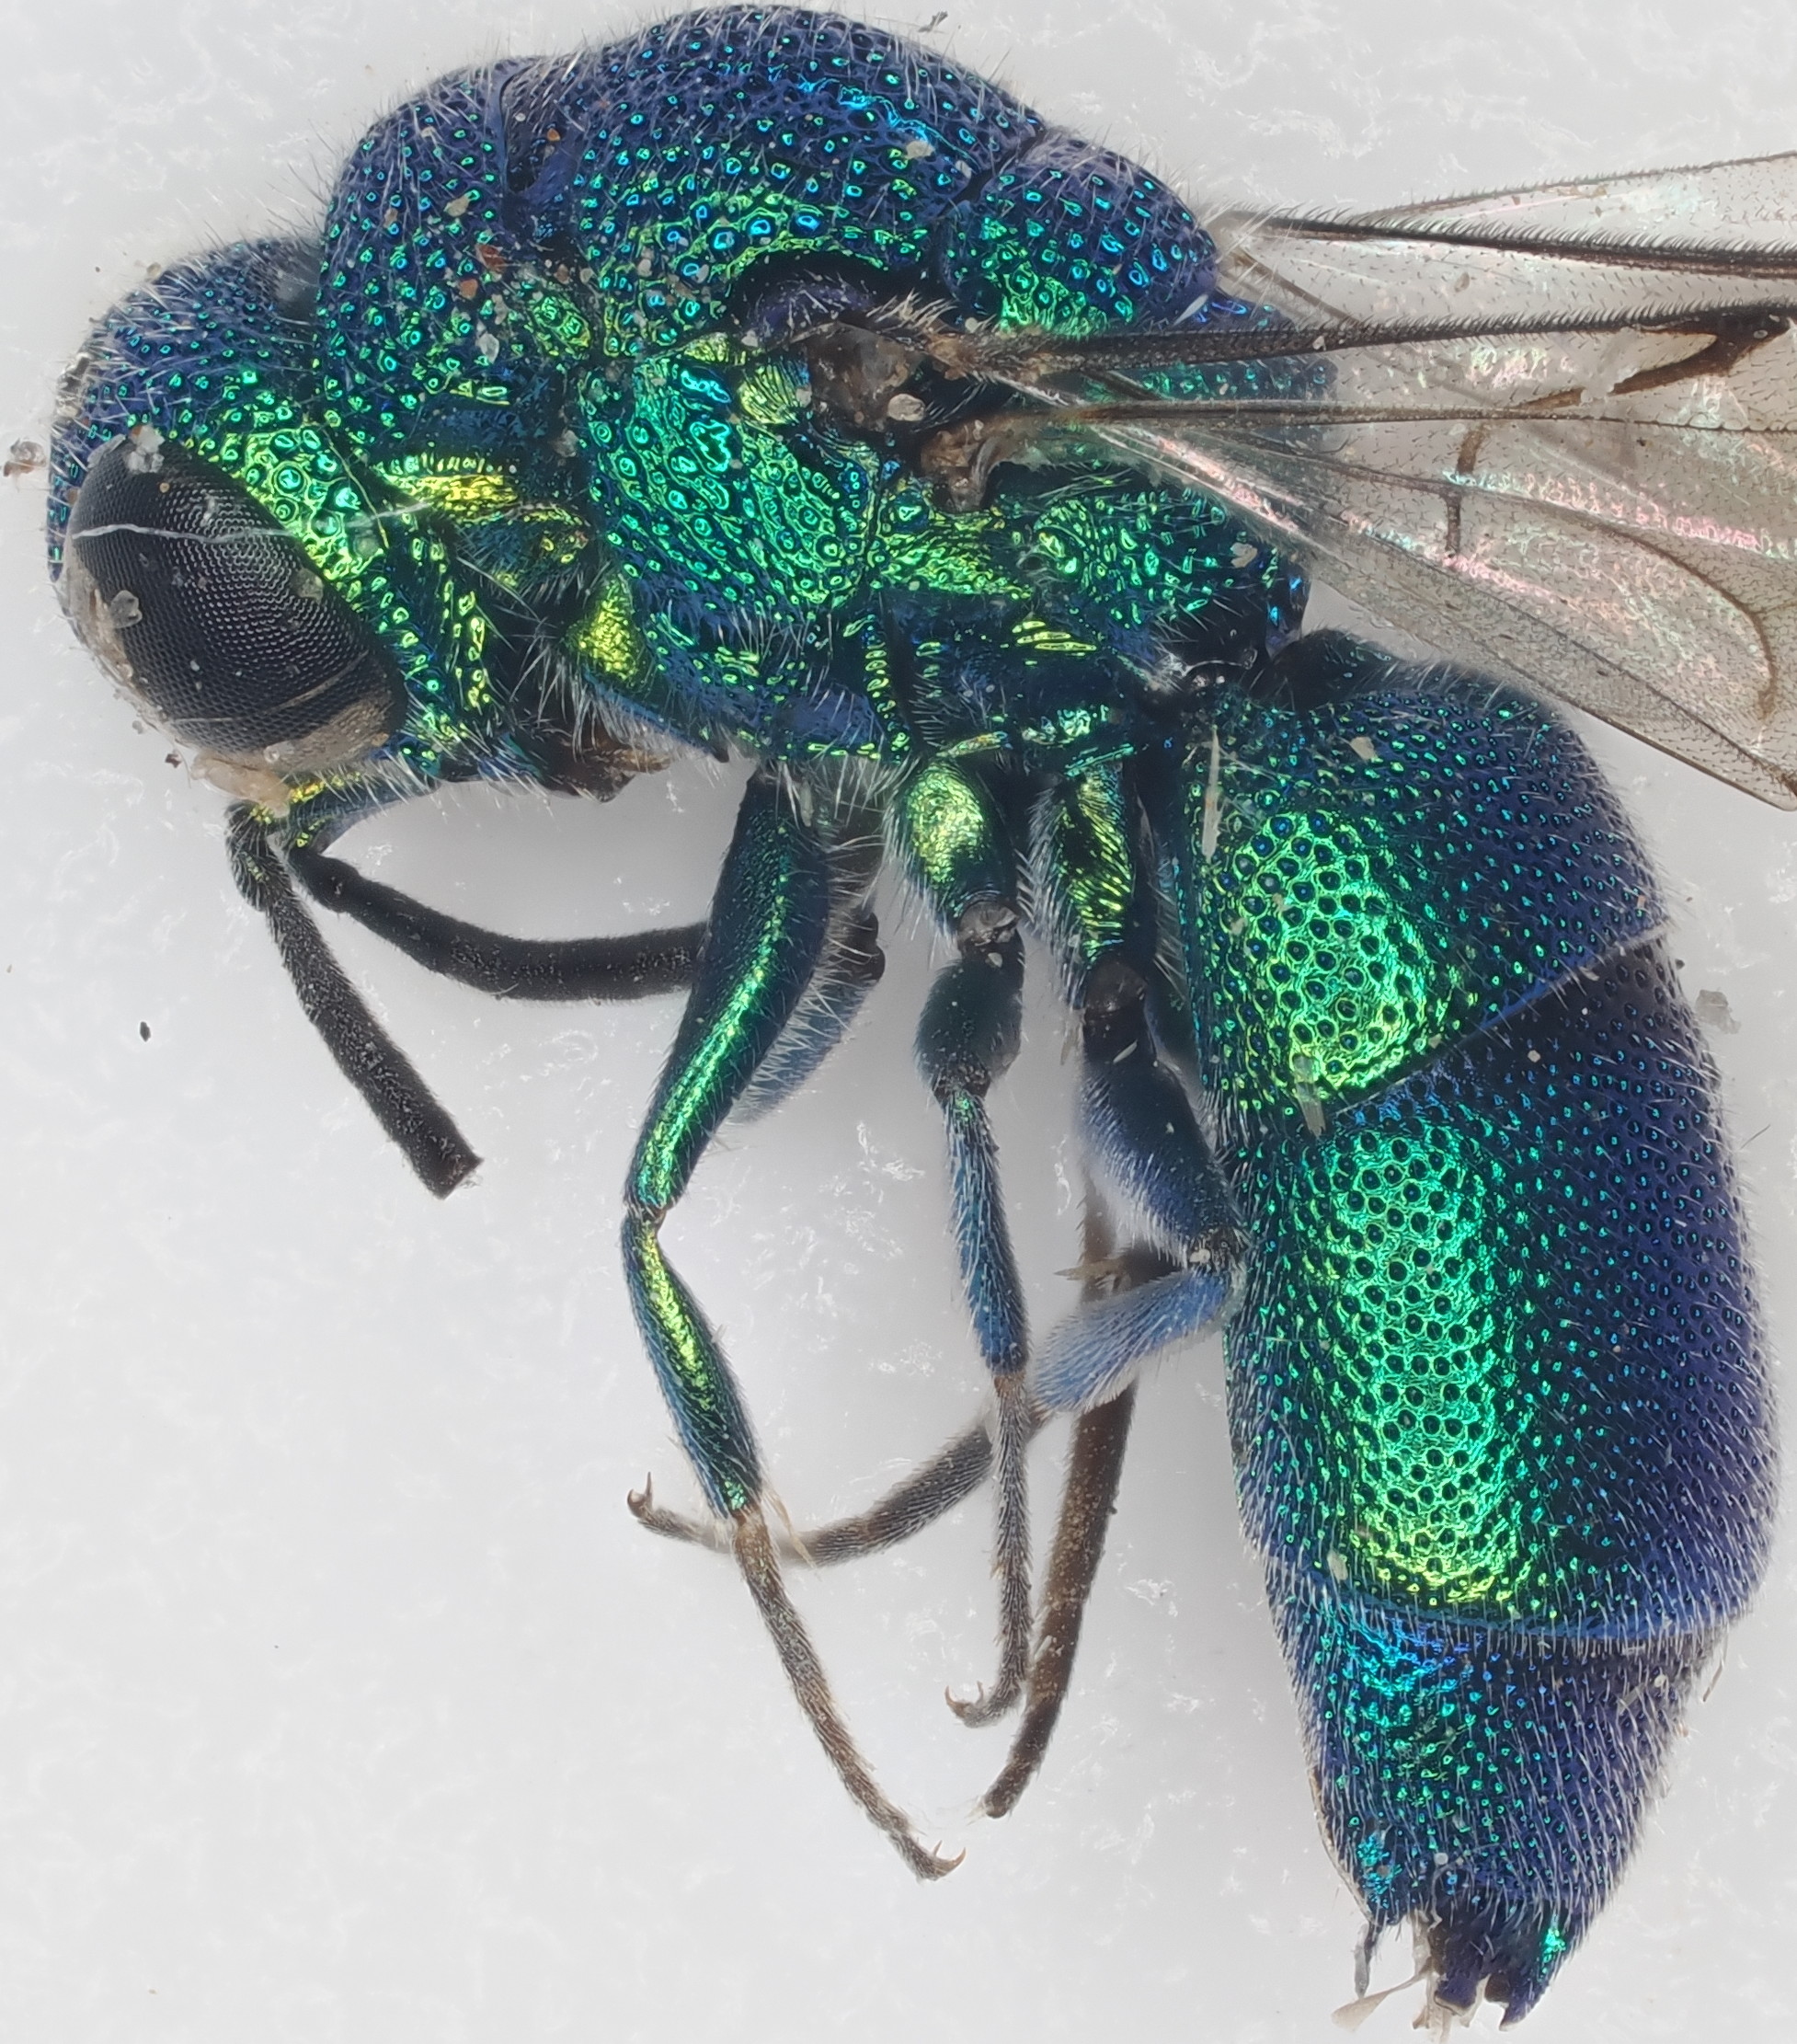
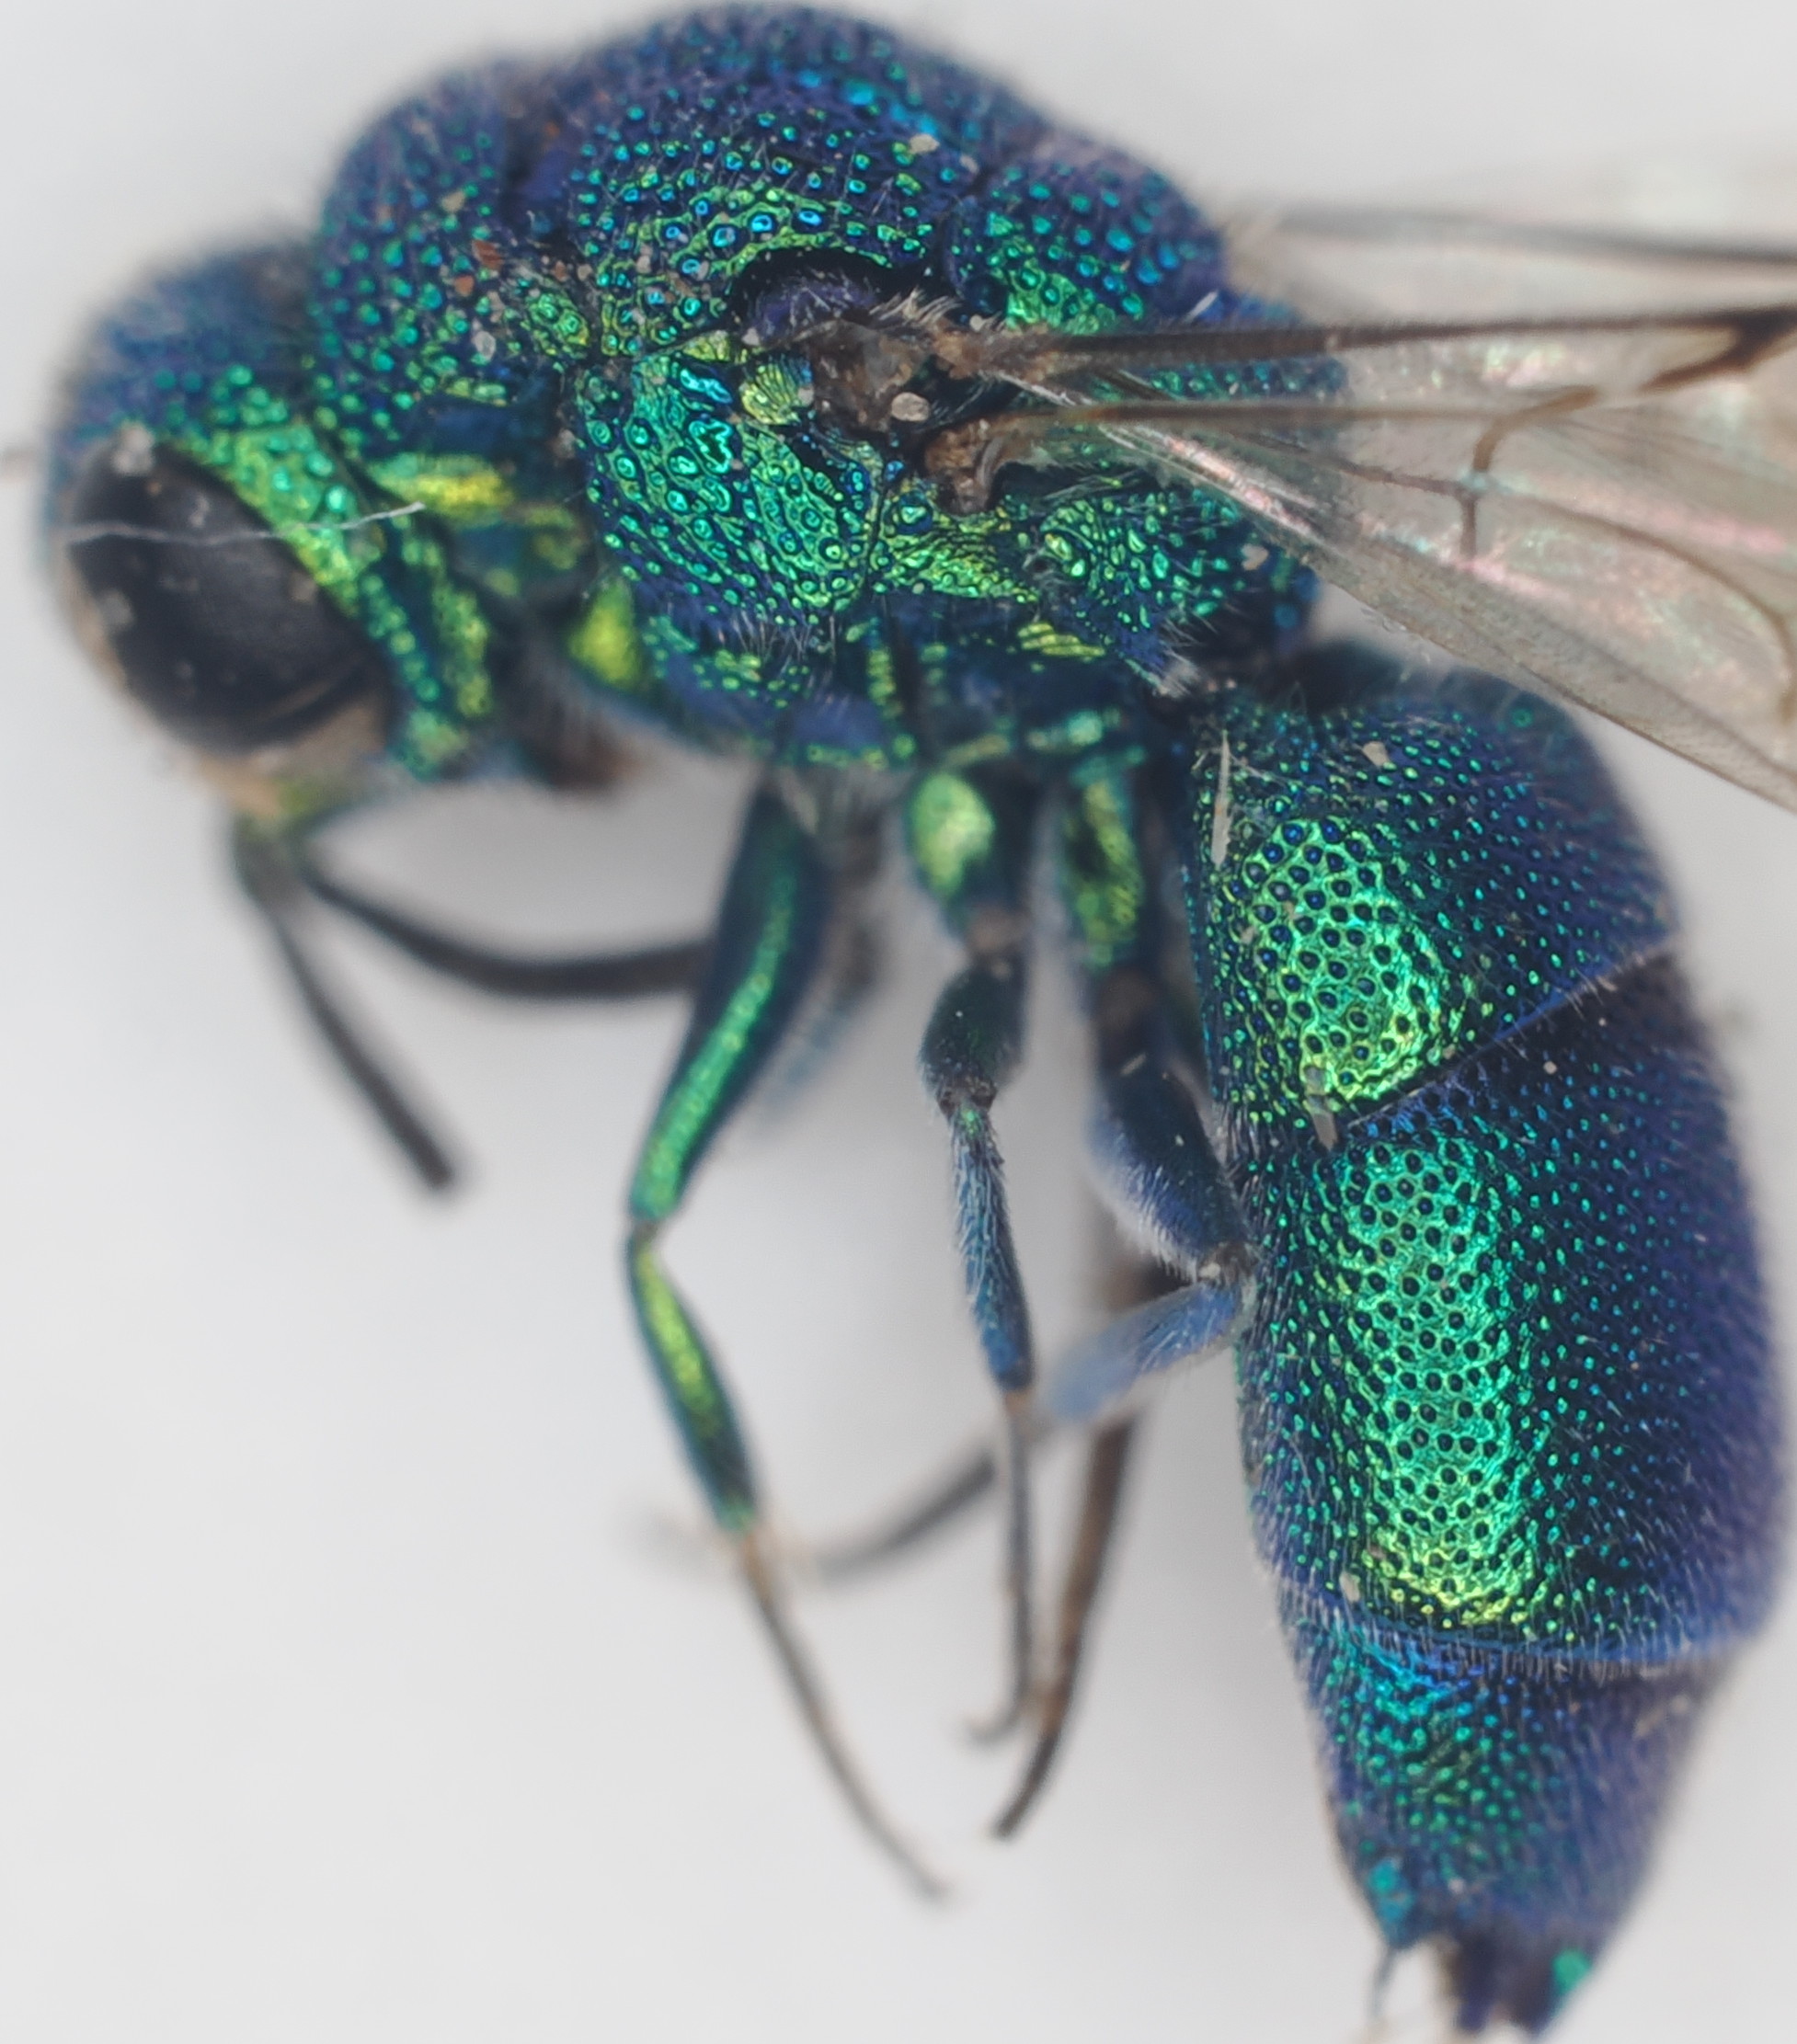
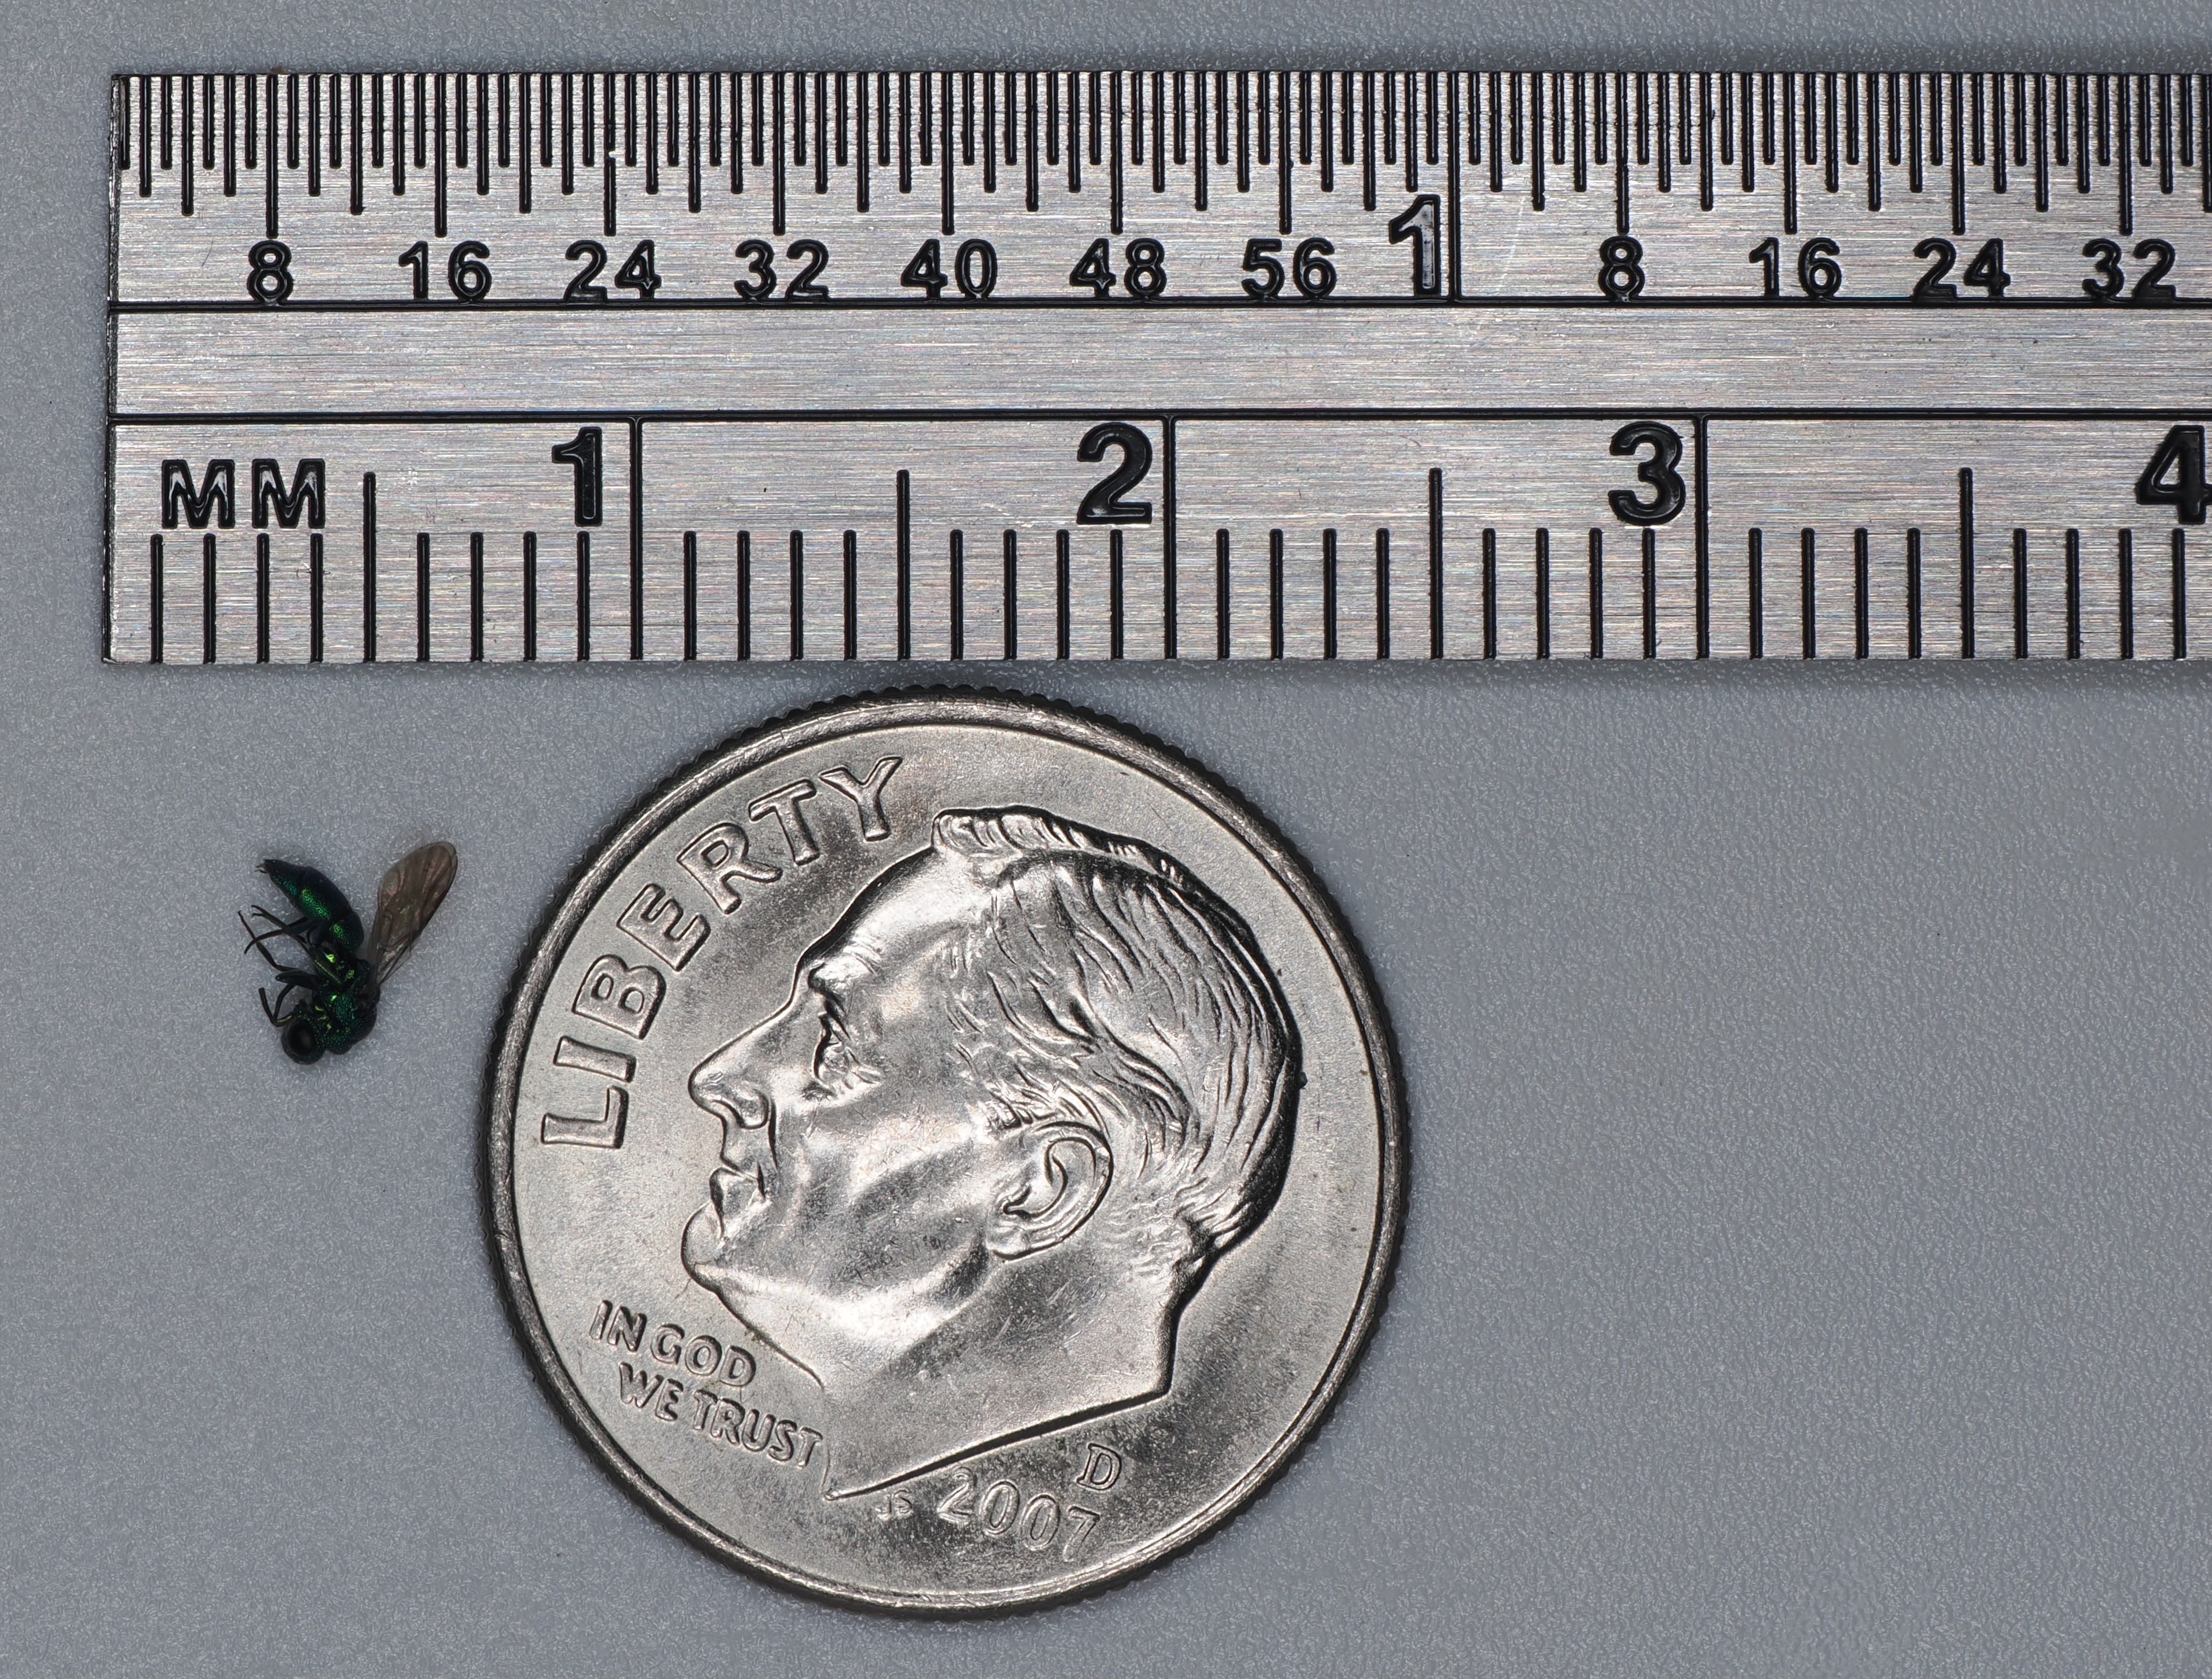
The above image was made by focus stacking – it is just to show the size of the insect we are discussing. The scale shows millimeter markings, so one can estimate the length of the insect as about 3-4 mm. It is small. The lens used for this example was a Zuiko 90mm macro and a 2 magnification Olympus teleconverter.
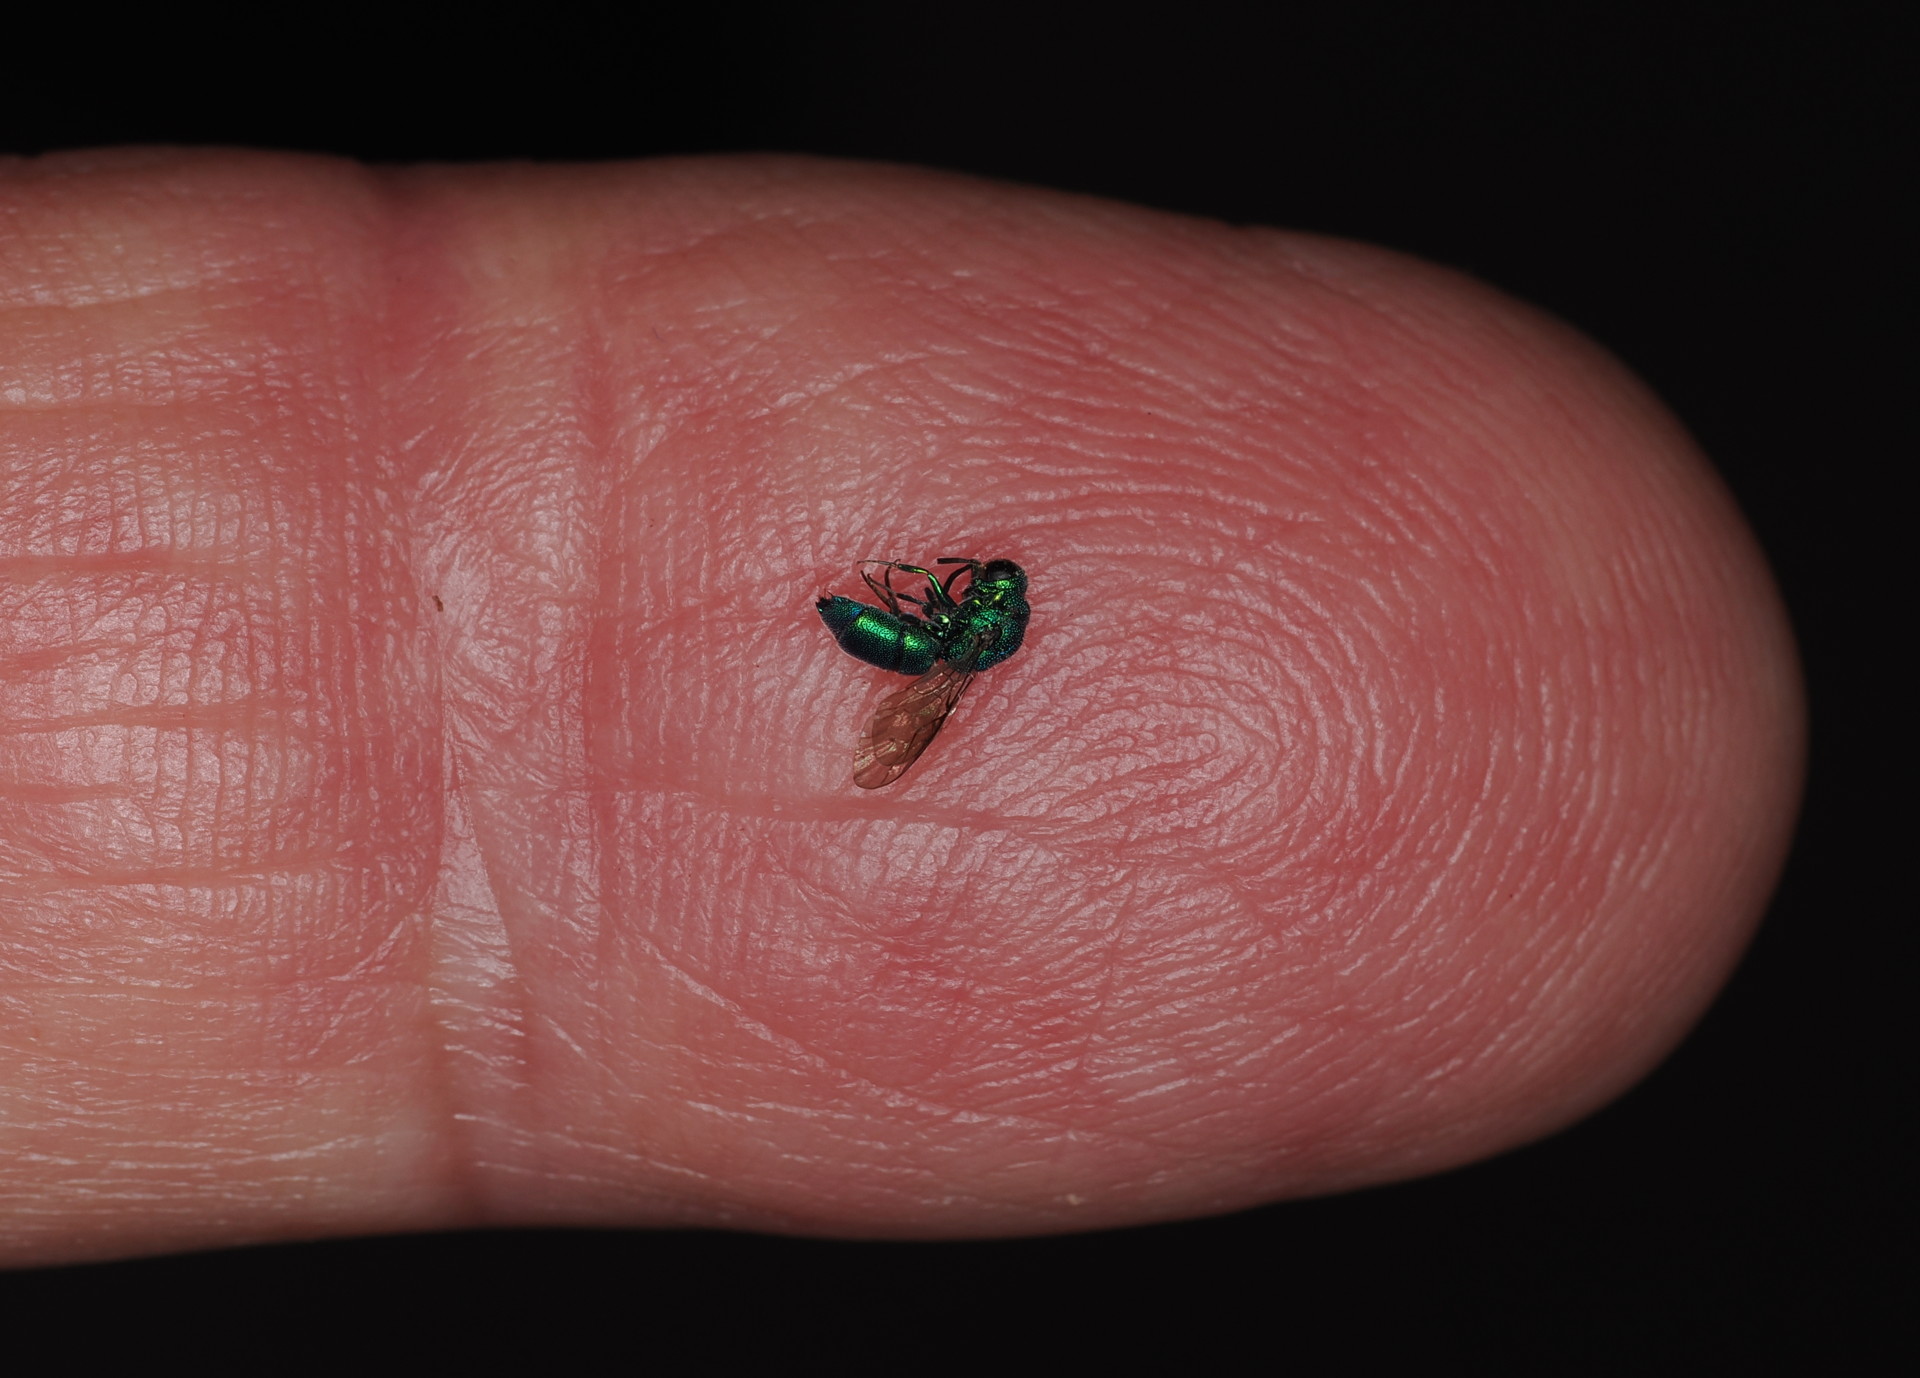
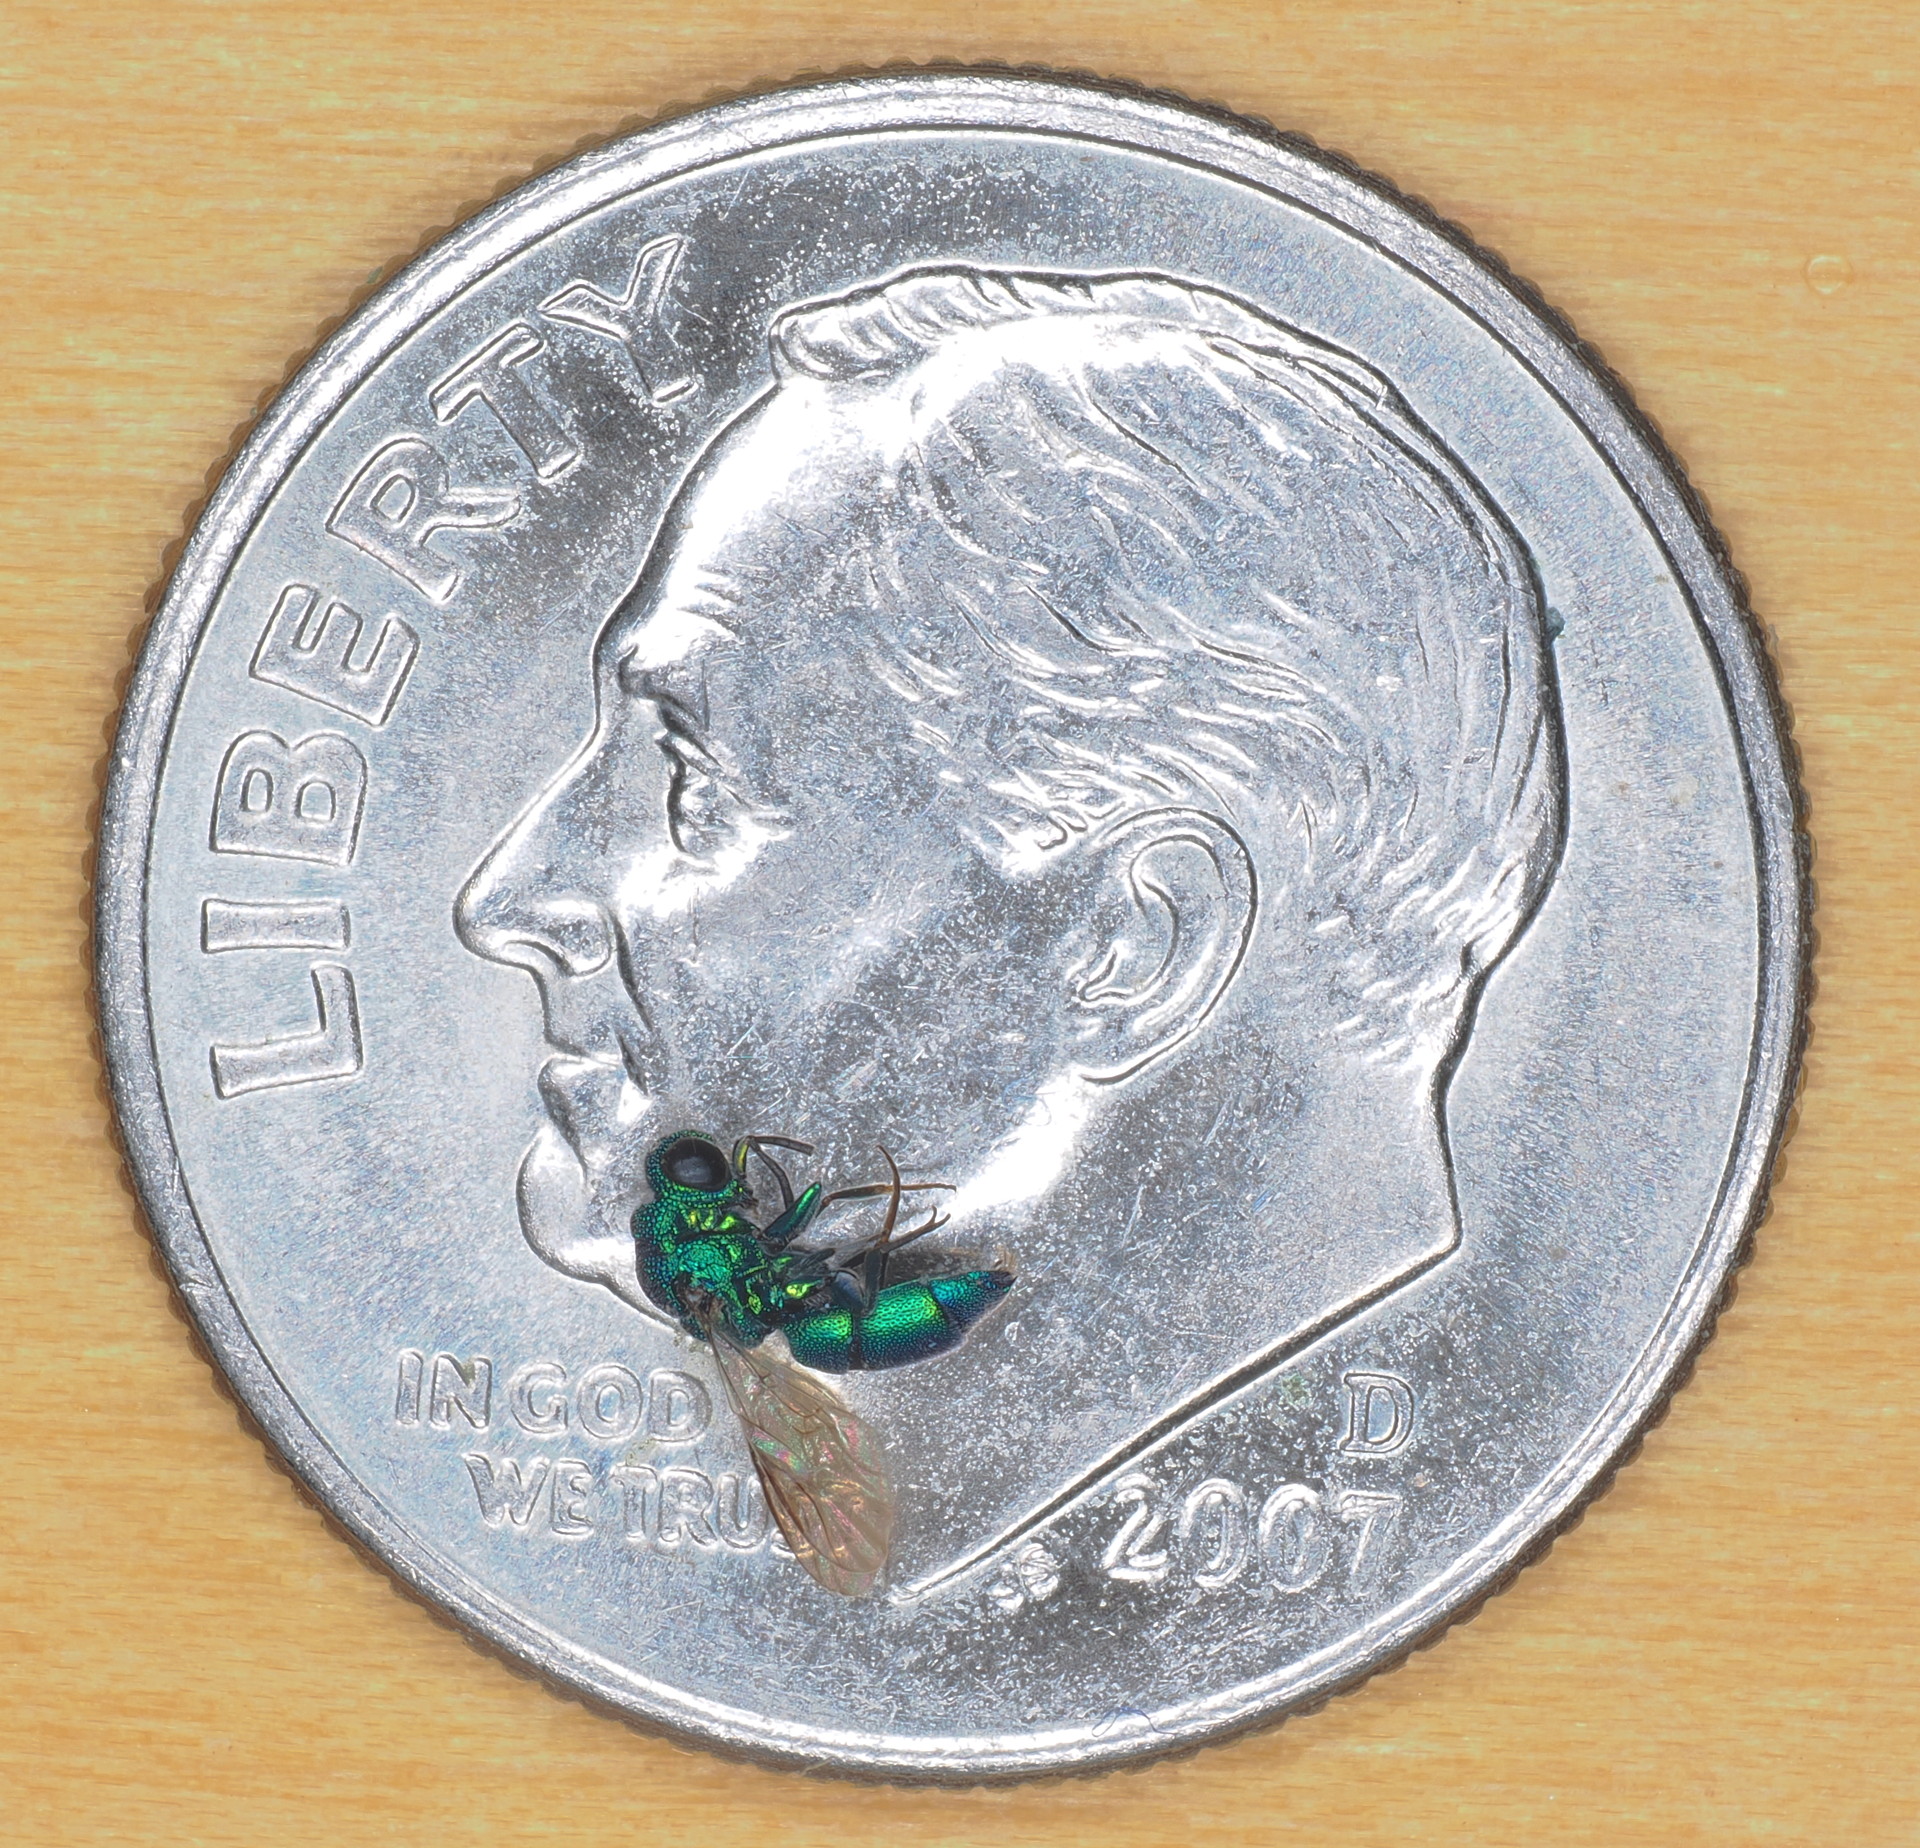
Often, a mm scale isn’t effective in conveying the size of the subject. Sometimes it is more effective to show the insect against subjects like those shown below, an index finger, a ruler and US dime, or just a closer view of the dime and fly. The objective is to show just how small the fly is, and how effective a flash/macro lens combination is to show details.
There are limitations to focus stacking for larger insects since there are usually few of these available (dead) at the UV lights. If they are on solid walls it is possible, with a short tripod to take images for stacking. I have done this on the walls of a cruise ship with “some” success. However, a supplementary ring light would be very handy for this because the time it takes to shoot a sequence of images for stacking depends on the shutter speed given the ambient lighting. For dark conditions a sequence of 20 images might take 20 seconds, under daylight conditions it might be 2 seconds. An insect will likely move less in 2 seconds than 20 seconds!
Images taken via focus-stacking during an Amazon cruise are shown below. The moths were stationary on the promenade bulkheads.
Metadata
Metadata is information that is hard to convert into quantifiable data for use, say in a computer, but that is useful for understanding the context of data or an observation. Metadata might be the weather conditions (temperature, wind, cloud cover etc) that existed during a mothing event, or the relative abundance of a particular species that night. Not that you identified a particular species – but that were lots of them! Or that tonight was much better than last night. Information that gives those working with the observations some context for the conditions under which they were made. Metadata could also include any problems encountered making the observation, or information on the representativeness of the observation. For example you might have seen many cactus – but all were high on a cliff and you could only photograph a poor example close to the road. Readers and scientists appreciate such information.
An especially important piece of metadata for most of our insect photos taken against the cage set-up shown above is that the distance between the main strands of the mesh is very close to 1 mm. Knowing this, it is possible to estimate the size of any insect photographed against the mesh.
An example of visual metadata might be below – with the text saying that there was a great diversity of moths that night.